Einführung: Was können Sie mit Follow View tun?
- Folgen Sie anderen Benutzern oder lassen Sie sich von anderen Benutzern folgen, während Sie in Ihrem Workspace navigieren (Zoomen/Schwenken).
- Erstellen Sie Benutzergruppen, um Situationen wie Workshops mit vielen Benutzern und Breakout-Sessions besser zu verwalten.
- Weisen Sie Bereiche innerhalb Ihres Workspaces zu, um eine schnelle und einfache Navigation zu ermöglichen und Benutzergruppen zu bestimmten Teilen des Workspaces zu koordinieren.
- Schränken Sie bestimmte Benutzer ein, um sie vorübergehend daran zu hindern, während Situationen wie Breakouts in Workshops zu navigieren oder zu bearbeiten.
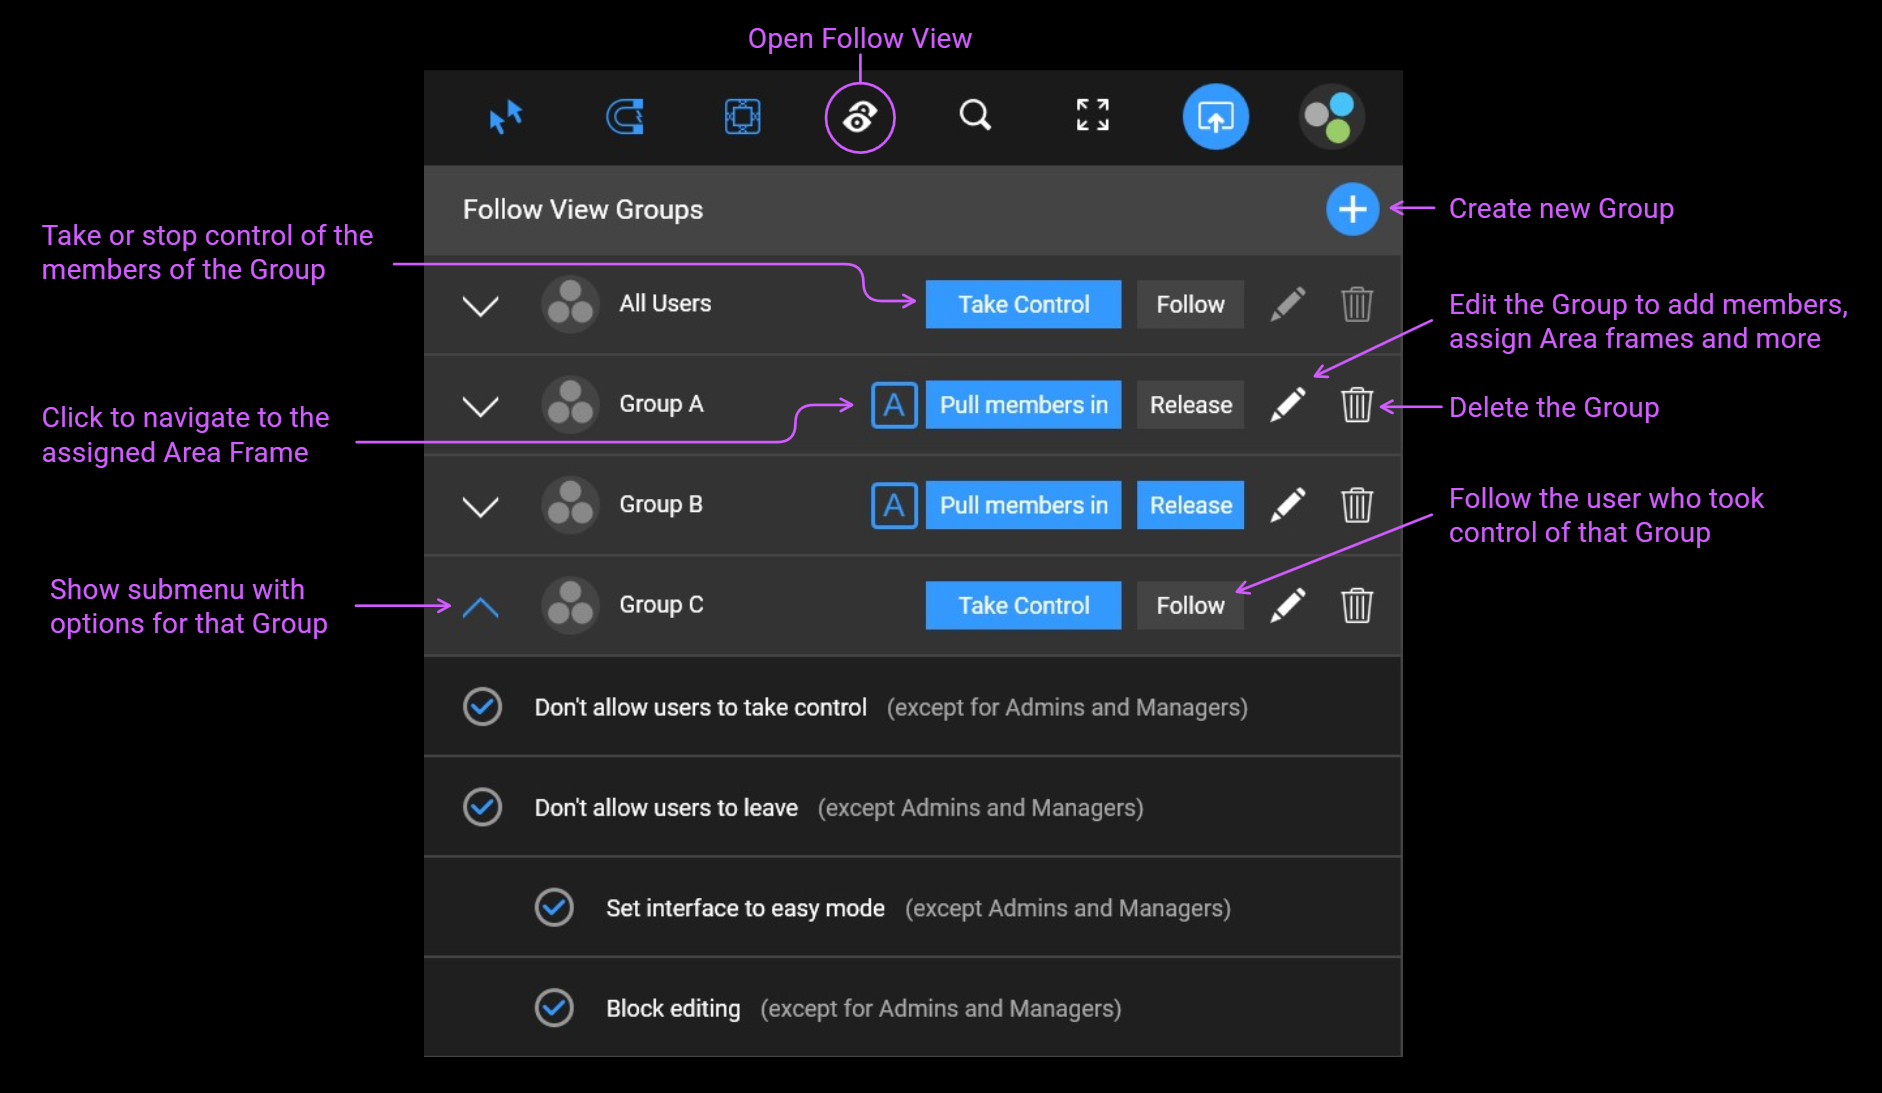
Andere Benutzer Ihnen folgen lassen (Steuerung übernehmen)
Wenn Sie in der Standardgruppe des Follow View-Menüs auf „Take control“ (Steuerung übernehmen) drücken, folgen alle Benutzer, die dasselbe Projekt geöffnet haben, Ihrer Navigation und sehen denselben Teil des Workspaces wie Sie.
Wenn sie das Projekt öffnen, nachdem Sie die Steuerung übernommen haben, folgen sie Ihnen ebenfalls sofort.
Um die Steuerung zu beenden, drücken Sie im Follow View-Menü auf „Stop control“ (Steuerung beenden).
Hinweis: Benutzer mit reinen Leserechten können die Steuerung nicht übernehmen. Sie können nur folgen oder das Folgen beenden.
Einem anderen Benutzer nicht mehr folgen
Wenn ein Benutzer die Steuerung übernommen hat und Sie nicht folgen möchten, drücken Sie im Follow View-Menü auf „Leave“ (Verlassen).
Hinweis: Ein Benutzer mit Admin- oder Managerrechten kann verhindern, dass Sie verlassen, wenn Sie nur Betrachter- oder Editorrechte haben.
Benutzergruppen erstellen
Wenn Sie nur bestimmte Benutzer steuern möchten, können Sie Gruppen erstellen, indem Sie auf die blaue +-Schaltfläche drücken.
Ein Dialog ermöglicht es Ihnen, Benutzer zur Gruppe hinzuzufügen. Drücken Sie „Create“ (Erstellen), um den Vorgang abzuschließen.
Benutzer daran hindern, die Steuerung zu übernehmen
Besonders bei der Verwaltung größerer Benutzergruppen möchten Sie vielleicht nicht, dass diese die Steuerung über andere Benutzer übernehmen.
Wenn Sie Admin- oder Managerrechte haben, können Sie verhindern, dass Benutzer die Steuerung übernehmen, während Sie die Steuerung haben:
Öffnen Sie das Untermenü einer Gruppe (Pfeil nach unten links) und aktivieren Sie die Option „Don’t allow users to take control“ (Benutzern nicht erlauben, die Steuerung zu übernehmen). Wann immer Sie die Steuerung dieser Gruppe übernehmen (durch Drücken der Schaltfläche „Take Control“), können andere Benutzer die Steuerung nicht übernehmen.
Hinweis: Nur Benutzer mit Anzeige- oder Bearbeitungsrechten sind betroffen. Benutzer mit Manager- oder Adminrechten können die Steuerung immer übernehmen.
Benutzer daran hindern, zu gehen, während Sie sie steuern
Wenn Sie Admin- oder Managerrechte haben, können Sie verhindern, dass Benutzer gehen, während Sie sie steuern. Dies zwingt sie, Ihrer Ansicht zu folgen, bis Sie die Steuerung beenden.
Öffnen Sie das Untermenü einer Gruppe (Pfeil nach unten links) und aktivieren Sie die Option „Don’t allow users to leave“ (Benutzern nicht erlauben zu gehen). Wann immer Sie die Steuerung dieser Gruppe übernehmen (durch Drücken der Schaltfläche „Take Control“), können andere Benutzer nicht gehen.
Hinweis: Nur Benutzer mit Anzeige- oder Bearbeitungsrechten sind betroffen. Benutzer mit Manager- oder Adminrechten können immer gehen.
Bereiche definieren und Gruppen zuweisen (Inhaltsverzeichnis für Projekte)
Sie können Area Frames (Bereichsrahmen) verwenden, um Ihr Projekt in mehrere Bereiche zu unterteilen. Wenn Sie diese Bereiche Gruppen zuweisen, können Sie das Follow View-Dropdown wie ein Inhaltsverzeichnis verwenden. Ein Klick auf eine Gruppe im Dropdown navigiert Sie dann zum entsprechenden Area Frame im Workspace.
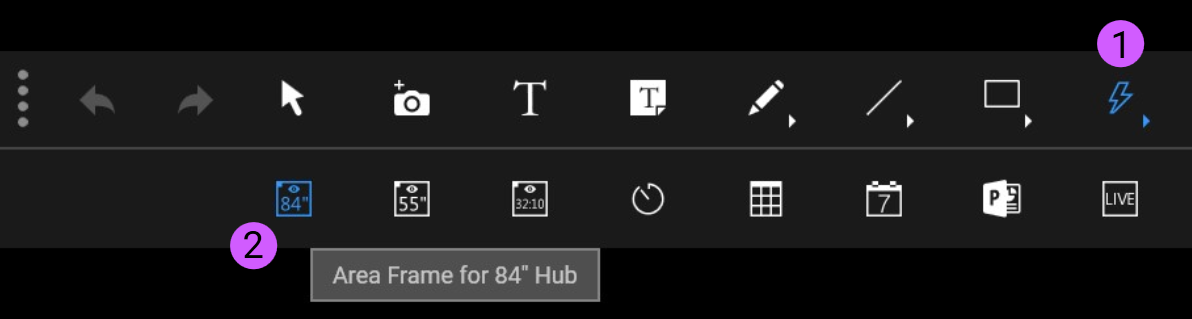
Um einen Area Frame zu erstellen, haben Sie zwei Möglichkeiten:
Öffnen Sie entweder das Menü „Widgets“ im Hauptmenü und wählen Sie eine der drei Area Frame-Schaltflächen ganz links aus. Klicken Sie dann in den Workspace. Sie können den Area Frame im Workspace frei verschieben und in der Größe ändern.
Optional können Sie Area Frames direkt aus dem Gruppendialog erstellen:
Drücken Sie die Schaltfläche „Edit“ (Bearbeiten) (Stiftsymbol) einer Gruppe. Schalten Sie den Modus auf „Use a defined Area Frame…“ (Definierten Area Frame verwenden…). Klicken Sie auf „Create Area Frame“ (Area Frame erstellen).
Um einer Gruppe einen beliebigen Area Frame zuzuweisen, bearbeiten Sie die Gruppe und klicken Sie auf „Select Area Frame“ (Area Frame auswählen).
Um zu einem Area Frame zu navigieren, klicken Sie einfach auf die Schaltfläche „A“ in einer Gruppe oder doppelklicken Sie auf den Namen der Gruppe.
Sie können die Liste der Gruppen neu ordnen, indem Sie eine Gruppe nach oben oder unten ziehen.
Benutzer zu bestimmten Area Frames navigieren (Mitglieder hereinziehen)
Wenn Sie alle Benutzer dorthin navigieren möchten, können Sie einfach selbst dorthin navigieren (z. B. durch Klicken auf die Schaltfläche „A“ einer Gruppe, der ein Area Frame zugewiesen ist) und dann in der Gruppe „All users“ (Alle Benutzer) oben im Follow View-Menü auf „Take control“ drücken.
Wenn Sie nur bestimmte Benutzer zu einem bestimmten Area Frame navigieren möchten, fügen Sie diese Benutzer der entsprechenden Gruppe hinzu (indem Sie die Gruppe bearbeiten und Benutzer hinzufügen) und drücken Sie dann die Schaltfläche „Pull members in“ (Mitglieder hereinziehen).
Alle Mitglieder dieser Gruppe werden dann sofort zum zugewiesenen Area Frame navigiert.
Sie können sofort wegnavigieren, wenn Sie die Option „Don’t allow users to leave“ nicht gesetzt haben.
Bestimmte Benutzer zwingen, in einem bestimmten Bereich Ihres Projekts zu bleiben (Aktivierter Area Frame)
Möglicherweise möchten Sie, dass bestimmte Benutzer auf einen bestimmten Bereich Ihres Projekts beschränkt sind. Sie können innerhalb dieses Bereichs frei navigieren, aber sie können diesen Bereich nicht verlassen, um Inhalte außerhalb davon zu sehen oder zu ändern.
Aktivieren Sie dazu einfach „Don’t allow users to leave“ im Untermenü einer Gruppe (Pfeil nach unten links).
Um die Benutzer wieder freizugeben, drücken Sie die Schaltfläche „Release“ (Freigeben) dieser Gruppe.
Hinweis: Wenn „Don’t allow users to leave“ für eine Gruppe aktiviert ist und einige Mitglieder dieser Gruppe das Projekt später öffnen, nachdem Sie „Pull members in“ gedrückt haben, werden sie direkt hereingezogen, sobald sie das Projekt laden. Wenn „Don’t allow users to leave“ nicht aktiviert ist, passiert Benutzern, die das Projekt später öffnen, nichts.
Hinweis: Nur Benutzer mit Anzeige- oder Bearbeitungsrechten sind betroffen. Benutzer mit Manager- oder Adminrechten sind nicht auf den Area Frame beschränkt.
Benutzer daran hindern, Inhalte zu bearbeiten
Möglicherweise möchten Sie Benutzer vorübergehend daran hindern, Änderungen im Workspace vorzunehmen.
Aktivieren Sie dazu „Block editing“ (Bearbeitung blockieren) im Untermenü einer Gruppe (Pfeil nach unten links).
Die Bearbeitung wird für alle Mitglieder dieser Gruppe in folgenden Situationen blockiert:
- Während Sie die Steuerung dieser Gruppe übernehmen (Wenn Sie die Steuerung beenden, können Mitglieder wieder bearbeiten).
- Wenn dieser Gruppe ein Area Frame zugewiesen ist: Während Mitglieder mit der Option „Don’t allow users to leave“ in diesen Area Frame hereingezogen sind.
Hinweis: Nur Benutzer mit Bearbeitungsrechten sind betroffen. Benutzer mit Manager- oder Adminrechten können weiterhin bearbeiten. Benutzer mit Anzeigerechten können natürlich nie bearbeiten.
Benutzeroberfläche auf einfachen Modus setzen
Wenn Sie Workshops mit unerfahrenen Benutzern durchführen, möchten Sie möglicherweise nicht benötigte Optionen und Schaltflächen vor ihnen verbergen. Sie können ihre Benutzeroberfläche in den Easy Mode (Einfacher Modus) schalten, in dem weniger Schaltflächen und Funktionen verfügbar sind und DEON-Tastaturkürzel deaktiviert sind. Dies macht es für die Teilnehmer einfacher und weniger wahrscheinlich, dass einer von ihnen etwas Unerwartetes tut, das Ihre Sitzung stören könnte.
Aktivieren Sie dazu „Set interface to easy mode“ (Benutzeroberfläche auf einfachen Modus setzen) im Untermenü einer Gruppe (Pfeil nach unten links).
Der Easy Mode wird für alle Mitglieder dieser Gruppe in folgenden Situationen aktiviert:
- Während Sie die Steuerung dieser Gruppe übernehmen (Wenn Sie die Steuerung beenden, sind Mitglieder wieder im normalen Modus).
- Wenn dieser Gruppe ein Area Frame zugewiesen ist: Während Mitglieder mit der Option „Don’t allow users to leave“ in diesen Area Frame hereingezogen sind.
Hinweis: Nur Benutzer mit Anzeige- oder Bearbeitungsrechten sind betroffen. Benutzer mit Manager- oder Adminrechten bleiben immer im vollen Modus.