Übersicht
DEON bietet eine flexible Alternative zu herkömmlichen Issue-Tracking-Systemen, indem es visuelle Klarheit, kontextbezogenes Bewusstsein und nahtlose Integration von Live-Inhalten kombiniert. Ob allein oder als Ergänzung zu Tools wie Jira oder Azure DevOps verwendet, ermöglicht DEON Teams, Aufgaben so zu organisieren und zu verwalten, wie sie tatsächlich zusammenarbeiten – visuell, dynamisch und im Kontext.
Das integrierte Issue-Tracking-System kann eigenständig verwendet werden, ermöglicht Benutzern aber auch, externe Systeme wie Jira oder Azure sowohl für Cloud-basierte als auch für dedizierte Serverszenarien zu verbinden.
Issues, Aufgaben, Bugs und vieles mehr können erstellt, Inhalte und Eigenschaften geändert und mit dem Server synchronisiert werden. Der Massenimport aus Jira und Azure DevOps wird ebenso unterstützt wie das Einfügen von Issue-URLs oder das Ziehen von Elementen aus Ihrem Browser direkt auf den Projekt-Canvas.
Die Option DEON Holistic Intelligence ist mit allen Issue-Tracking-Modi kompatibel. Dies ermöglicht die kontextbezogene Nutzung von KI über Issue-Tracking-Workflows hinweg und unterstützt sowohl von DEON bereitgestellte KI-Dienste als auch benutzerdefinierte KI-Endpunkte, die intern in Ihrer Organisation gehostet werden.
Funktionen
- Nutzen Sie leistungsstarke Tools in DEON, um Issues, Aufgaben, Ziele und Ähnliches zu verfolgen
- Verbinden Sie sich einfach mit Atlassian Jira®, Microsoft® Azure® DevOps und Wrike®
- Sehen Sie Ihre Projekte auf einen Blick
- Erstellen Sie neue Tickets und bearbeiten Sie sie im Handumdrehen
- Importieren Sie einzelne Elemente, eine Massenliste oder aus einer gefilterten Sammlung
- Leistungsstarke Suchabfragesprache
- Synchronisieren Sie Ihre Arbeit mit einem Klick mit Ihrem Server
- Organisieren Sie Ihre Elemente mit mehreren integrierten Layouts
- Erstellen Sie Ihre eigenen Vorlagen und teilen Sie sie mit Ihrem Team oder Ihrer Organisation
- Vollständige KI-Integration über den DEON Holistic Intelligence Multimodal Kernel (HMK)
Vergleich DEON vs. Jira und Azure DevOps
1. Eigenständiges Issue Tracking mit DEON
DEONs integriertes Issue Tracking ist für Teams optimiert, die einen leichten, visuellen Ansatz ohne den Overhead komplexer Workflows oder starrer Strukturen benötigen.
Beispielszenario:
Ein Produktteam führt eine wöchentliche Planungssitzung durch. Aufgaben werden räumlich nach Funktionsbereich abgebildet, mit Spezifikationen auf SharePoint verknüpft und mit Design-Mockups und Feedback-Notizen gruppiert. Das Team kann sehen, was getan werden muss, den Kontext verstehen und sofort handeln.
Hauptstärken:
- Visuelle Organisation von Tickets – nach Priorität, Thema, Eigentümer oder Zeitplan.
- Eingebettete Live-Links zu Cloud-Speichern (z. B. SharePoint, OneDrive) stellen sicher, dass Dokumente aktuell bleiben und Duplikate vermieden werden.
- Ermöglicht flexible, Ad-hoc-Workflows, die auf die Teampräferenzen zugeschnitten sind.
- Besonders gut geeignet für agile, funktionsübergreifende Teams und Projekte in der Frühphase.
2. DEON kombiniert mit Jira oder Azure DevOps
In strukturierteren Umgebungen erweitert DEON traditionelle Tools, indem es als visuelle und kollaborative Schnittstelle auf Jira oder Azure DevOps dient. Es bietet Teams und Stakeholdern ein klareres Verständnis der Daten – ohne die Vorteile von Enterprise-Systemen zu verlieren.
Beispielszenario:
Während einer PI-Planungssitzung bettet ein Delivery Manager Live-Jira-Abfragen in DEON ein. Um sie herum enthält der Canvas Architekturdiagramme, Geschäftsziele und Teamnotizen. Stakeholder können Abhängigkeiten, Prioritäten und Kompromisse sofort erkennen, ohne Tools zu wechseln oder den Kontext zu verlieren.
Hauptstärken:
- Live-Einbettung von Jira- oder Azure DevOps-Ansichten (z. B. Ticketabfragen, Boards, Dashboards).
- Verbesserter Meeting-Fluss und Stakeholder-Engagement durch einen einzigen, interaktiven Multiuser-Canvas.
- Fähigkeit, strukturierte Ticketdaten mit visuellen Elementen wie Mindmaps, User Flows oder Referenzmaterialien in Dokumenten oder eingebetteten Websites zu kombinieren
- Hilft, die Lücke zwischen Delivery-Teams und Business-Stakeholdern zu schließen.
Verknüpfte Daten ohne Redundanz
Der DEON-Canvas unterstützt das direkte Einbetten von Dokumenten und Ressourcen von Plattformen wie SharePoint, OneDrive, Notion oder Confluence – nicht als statische Kopien, sondern als live verknüpfte Inhalte. Dies stellt sicher, dass Teams immer mit den aktuellsten Informationen arbeiten, Versionskonflikte vermieden und unnötige Duplikate über Tools hinweg reduziert werden.
Hauptvorteile der Verwendung von DEON für Issue Tracking
- Visuelle Übersicht: Organisieren und navigieren Sie Issues räumlich und erhalten Sie ein klareres Verständnis von Prioritäten und Beziehungen.
- Kontextbezogene Integration: Kombinieren Sie Tickets mit Spezifikationen, Diagrammen oder Dashboards – live eingebettet im Workspace.
- Flexible Strukturierung: Passen Sie Ihr Setup an Ihren Workflow an, nicht umgekehrt.
- Reduzierter Tool-Wechsel: Greifen Sie direkt in DEON auf Jira-, SharePoint- oder DevOps-Inhalte zu.
- Verbesserte Zusammenarbeit: Echtzeit- und asynchrone Bearbeitung auf einem gemeinsamen, interaktiven Canvas.
- Bessere Abstimmung: Besonders wertvoll in hybriden Umgebungen, in denen verschiedene Rollen unterschiedliche Ansichten derselben Daten benötigen.
- KI-bereit: Kompatibel mit DEON Holistic Intelligence und benutzerdefinierten KI-Endpunkten für kontextbezogene Unterstützung beim Issue Tracking.
DEONs integrierte Funktionen
DEON verfügt über ein einsatzbereites Issue-Tracking-System, mit dem Benutzer Elemente basierend auf einigen vordefinierten Konfigurationen erstellen und verwalten können.
Hinweis: Für die Verwendung des integrierten Issue Trackings ist keine Einrichtung erforderlich.
Neue Tickets können einfach über das Widgets-Menü in der DEON-Hauptmenüleiste erstellt werden, wie unten gezeigt.
![]()
Hinweis: Die Import-Schaltfläche ist nur für kombiniertes Issue Tracking mit Jira, Azure DevOps oder Wrike verfügbar.
![]() Die Schaltfläche „Create Issue“ aktiviert das Tool zur Issue-Erstellung. Klicken Sie irgendwo in das Projekt, um an dieser Position ein neues Ticket zu erstellen. Ein Dialog erscheint, der Sie durch alle erforderlichen Schritte führt.
Die Schaltfläche „Create Issue“ aktiviert das Tool zur Issue-Erstellung. Klicken Sie irgendwo in das Projekt, um an dieser Position ein neues Ticket zu erstellen. Ein Dialog erscheint, der Sie durch alle erforderlichen Schritte führt.
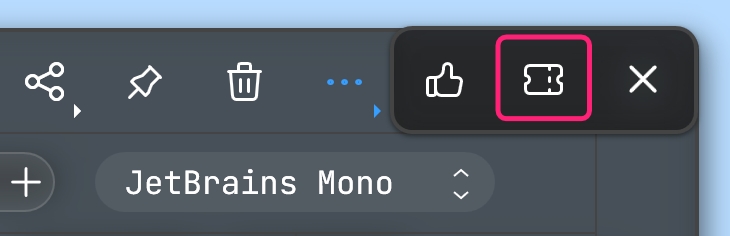
Tipp: Sie können auch normale Textelemente wie Haftnotizen in Issue-Tracking-Tickets umwandeln. Wählen Sie einfach ein oder mehrere Textelemente im Workspace aus. Gehen Sie im Kontextmenü zum Drei-Punkte-Menü in der oberen rechten Ecke und klicken Sie auf die Issue-Tracking-Schaltfläche, wie im Screenshot unten gezeigt.
Tipp: Sie können Tickets auch aus Excel importieren. Öffnen Sie zuerst Ihre Excel-Datei mit MS Excel und wählen Sie die Zellen aus, die den Zusammenfassungstext der Tickets enthalten. Kopieren/Einfügen (Strg+c/Strg+v) Sie sie in den DEON Workspace. Dadurch wird eine Haftnotiz pro Zelle erstellt. Wählen Sie dann alle diese Haftnotizen aus und wandeln Sie sie in Tickets um, indem Sie auf die Issue-Tracking-Schaltfläche im Drei-Punkte-Menü in der oberen rechten Ecke des Kontextmenüs klicken (wie oben beschrieben).
Derzeit stehen zwei verschiedene Projekttypen zur Auswahl. Die Auswahl des einen oder anderen steuert die zugehörigen Metadaten-Auswahloptionen wie Issue-Typen, Prioritäten, Workflow-Status usw. DEON ermöglicht auch die Auswahl eines Bearbeiters aus den aktuellen DEON-Projektmitgliedern.
Dies zeigt den Create-Dialog und Issue/Ticket-Karten, die mit dem integrierten System erstellt wurden:
![]()
![]()
Wie oben gezeigt, können Benutzer gemeinsame Attribute wie einen definierenden Issue-Typ, eine Zusammenfassung, eine Beschreibung, eine Priorität und einen Bearbeiter angeben. DEON erstellt automatisch eine ID für jedes neue Issue. Nach der Erstellung erscheint ein neues Ticket im DEON-Workspace, das alle angegebenen Daten sowie einige leicht unterscheidbare Farben enthält.
Wenn Sie eines dieser Tickets auswählen, erhalten Benutzer ein Kontextmenü, das auch Optionen zum Bearbeiten enthält, wie unten gezeigt.
![]()
![]() Dies öffnet den Bearbeitungsdialog, der es Benutzern ermöglicht, den aktuellen Workflow-Status, den Bearbeiter, die Priorität und auch den Issue-Beschreibungstext zu ändern.
Dies öffnet den Bearbeitungsdialog, der es Benutzern ermöglicht, den aktuellen Workflow-Status, den Bearbeiter, die Priorität und auch den Issue-Beschreibungstext zu ändern.
![]() Die Verwendung dieser Menüschaltfläche schaltet durch mehrere Anzeigeoptionen für das/die ausgewählte(n) Issue(s). Es kann entweder auf Card (wie oben gezeigt),
Die Verwendung dieser Menüschaltfläche schaltet durch mehrere Anzeigeoptionen für das/die ausgewählte(n) Issue(s). Es kann entweder auf Card (wie oben gezeigt),
auf Line : ![]()
oder auf Minimal gesetzt werden:
![]()
Jedes Ticket enthält mehrere Informationen, die unten aufgeführt sind.
![]()
- Dieses Symbol zeigt an, zu welchem Projekt es gehört oder, wenn das Tracking-Projekt kein Symbol angibt, welches Tracking-System verwendet wird, um dieses Issue zu erstellen.
- Dies enthält den Projektnamen.
- Dieser Bezeichner stellt die ID des Issues dar. Bei externen Systemen öffnet ein Klick darauf die Ticket-URL in einem Browser.
- Dies enthält den zugrunde liegenden Issue-Typ.
- Das Symbol zeigt den aktuellen Synchronisierungsstatus an und gibt an, ob das ausgewählte Issue aktualisiert werden muss oder Änderungen aufweist, die noch nicht auf den Server übertragen wurden.
- Name des Bearbeiters (falls in den Details des Issues angegeben).
- Die Priorität oder Schwere dieses Issues.
- Der aktuelle Workflow-Status.
- Die Zusammenfassung oder Beschreibung des Tickets. Die Schaltfläche links davon ermöglicht das Umschalten zwischen Beschreibung und Zusammenfassung.
Initiale DEON-Vorbereitung für kombiniertes Issue Tracking
Wenn Sie DEON mit Jira, Azure DevOps oder Wrike verbinden möchten, muss das kombinierte Issue-Tracking-System in den Einstellungen aktiviert werden. Dies ist nicht erforderlich, wenn Sie nur das integrierte Issue Tracking verwenden möchten.
Hinweis: Issue-Tracking-Einstellungen gelten für ein DEON-Projekt. Verschiedene Projekte können unterschiedliche Issue-Tracking-Einstellungen haben. Wenn Sie Ihr DEON-Projekt teilen, müssen andere Benutzer diese Einstellungen nicht einrichten, es sei denn, sie möchten auch Issues aus dem externen System (Jira, Azure DevOps oder Wrike) synchronisieren oder importieren können. Die Tickets, die Sie in einem DEON-Projekt erstellen, importieren oder synchronisieren, sind für andere Benutzer im Projekt immer sichtbar und bearbeitbar (wenn Benutzer Bearbeitungsrechte für das DEON-Projekt haben). Wenn ein Benutzer ein Ticket im DEON-Workspace ändert, wird es nicht automatisch mit dem externen System synchronisiert, bis ein Benutzer, der die Issue-Tracking-Einstellungen eingerichtet hat, die Synchronisierung auslöst. Dieser Prozess wird unten im Detail erklärt.
![]() Öffnen Sie das DEON-Einstellungsfeld, indem Sie auf das Zahnradsymbol in der oberen linken Ecke von DEON klicken.
Öffnen Sie das DEON-Einstellungsfeld, indem Sie auf das Zahnradsymbol in der oberen linken Ecke von DEON klicken.
Das Bild unten zeigt die erforderliche Option, die aktiviert werden muss.
![]()
Sobald dies aktiviert ist, muss DEON neu gestartet werden. Danach zeigt derselbe Einstellungsdialog erweiterte Optionen bezüglich der Konfiguration des Systems und potenzieller Verbindungen zu anderen (externen) Tracking-Systemen wie Azure oder Jira.
![]()
Der zweite Reiter oben auf dieser Konfigurationsseite ermöglicht das Einrichten neuer Verbindungen. Das Dropdown-Menü bietet standardmäßig nur die Option Custom. Das bedeutet, dass Benutzer alle Verbindungsparameter manuell definieren müssen. Auf unterstützten dedizierten DEON-Plattformen enthält dieses Menü zusätzliche Optionen mit vorkonfigurierten Verbindungen, für die der DEON-Server alle erforderlichen Daten bereitstellt.
![]()
Das Hinzufügen einer neuen leeren Verbindung durch Klicken auf das Plus-Symbol ![]() erzeugt das folgende Ergebnis.
erzeugt das folgende Ergebnis.
![]()
Das Erweitern des neu erstellten Elements in der Liste zeigt alle Konfigurationsoptionen der ausgewählten Verbindung. Jede Verbindung hat einige obligatorische oder erforderliche Attribute und einige optionale. Zum Beispiel benötigt jede Verbindung einen erkennbaren Namen, eine Adresse des Remote-Servers, eine Auswahl des vorgesehenen Systems und der Umgebung sowie den Ziel-Authentifizierungsmodus. Zusätzlich können Benutzer das Kontrollkästchen für Client-Zertifikate aktivieren, wenn der Server eines oder mehrere benötigt, und eine Liste von Projektfiltern angeben, um den Umfang dessen einzuschränken, worauf DEON auf dem Remote-System zugreift.
![]()
![]()
![]() Diese Option ermöglicht das Laden gespeicherter Verbindungskonfigurationsdaten aus einer lokalen Datei.
Diese Option ermöglicht das Laden gespeicherter Verbindungskonfigurationsdaten aus einer lokalen Datei.
![]() Dies ermöglicht das Speichern aller bereitgestellten Verbindungskonfigurationsdaten in einer lokalen Datei.
Dies ermöglicht das Speichern aller bereitgestellten Verbindungskonfigurationsdaten in einer lokalen Datei.
![]() Benutzer können auf dieses Symbol klicken, um sich manuell von der ausgewählten Verbindung abzumelden.
Benutzer können auf dieses Symbol klicken, um sich manuell von der ausgewählten Verbindung abzumelden.
Jede Verbindung pro Projekt zu einem externen System muss auf dieser Konfigurationsseite im DEON-Einstellungsdialog hinzugefügt und konfiguriert werden. Sobald Benutzer mit dem Hinzufügen und Konfigurieren von Daten fertig sind, muss der Dialog durch Klicken auf OK akzeptiert werden, und DEON beginnt mit dem Herunterladen der erforderlichen Metadaten von der angegebenen Serveradresse. DEON erstellt auch einen lokalen Datencache, der verwendet wird, um die Anzahl der Serveranfragen zu minimieren und die Geschwindigkeit beim Arbeiten mit der ausgewählten Verbindung zu maximieren.
Initiales Jira®-Setup
Die Menge der erforderlichen Einstellungen für die Integration von Jira hängt davon ab, ob es sich bei dem vorgesehenen System um ein Cloud-basiertes Jira (von Atlassian gehostet) oder ein dediziertes, sogenanntes On-Premise-System handelt, das vom Benutzer gehostet und gewartet wird.
Cloud-basiert
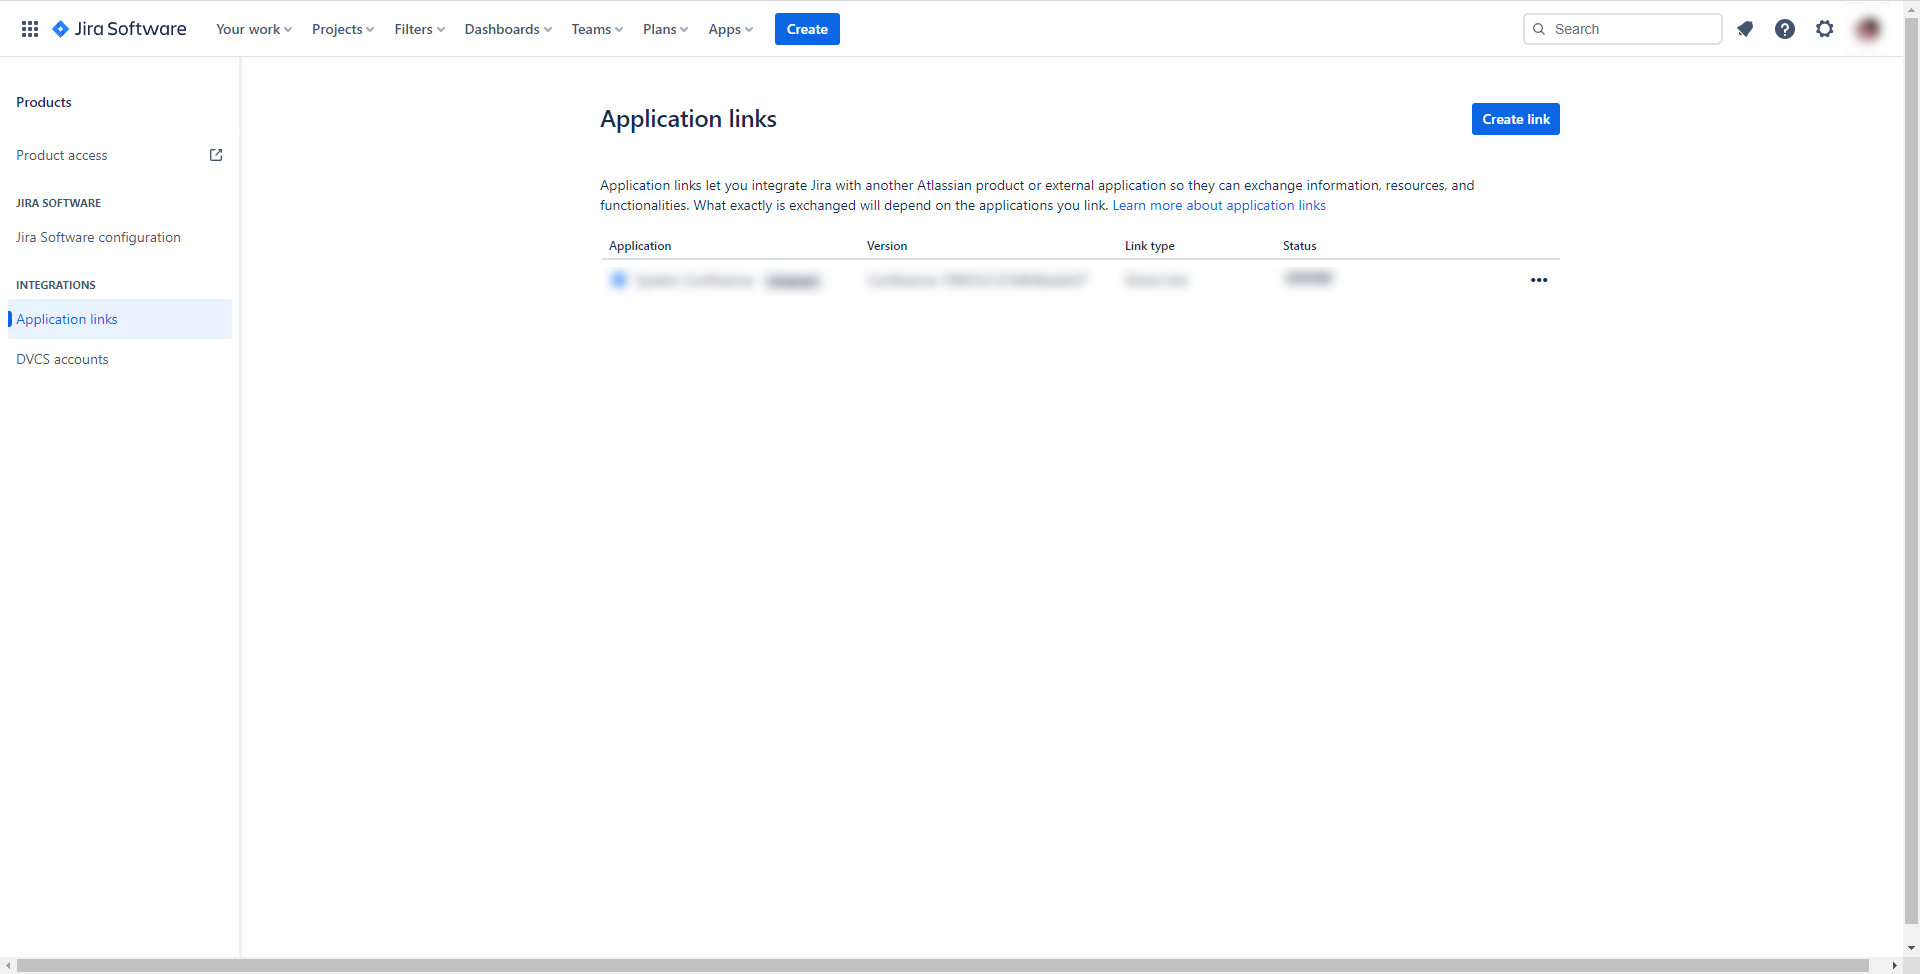
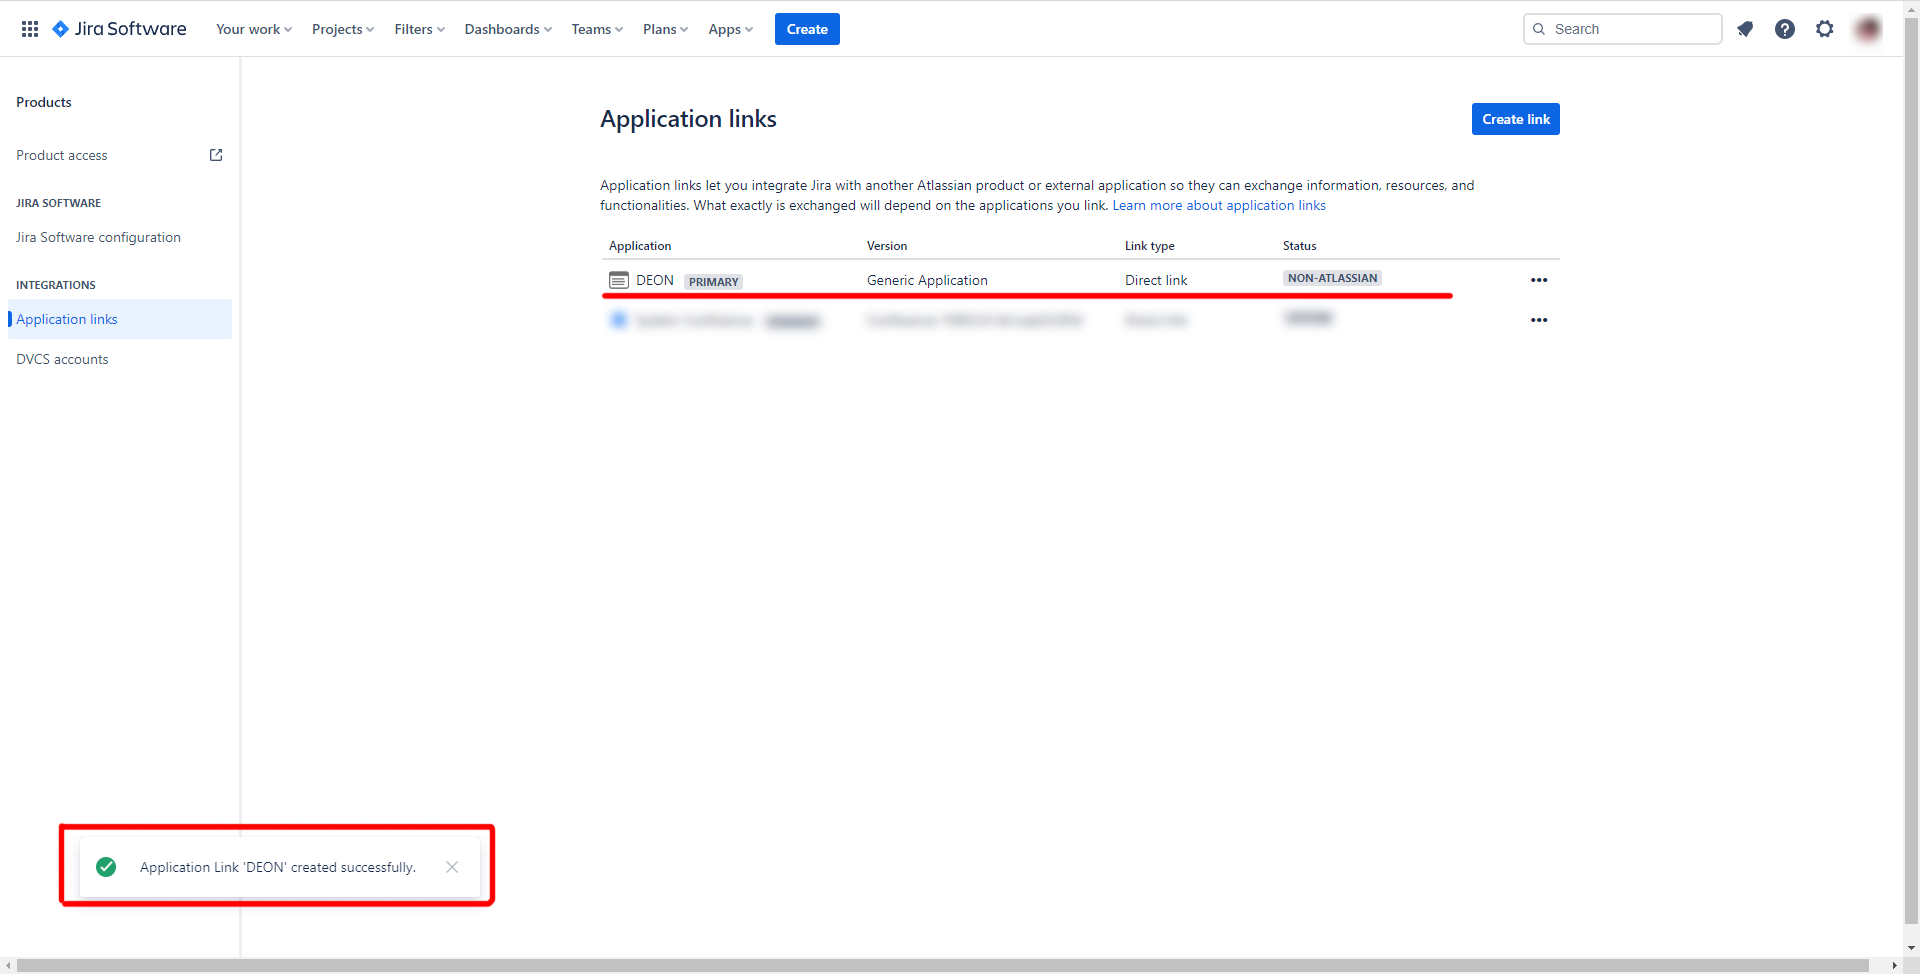
Das Cloud-basierte Jira-System bietet derzeit mehrere Möglichkeiten zur Authentifizierung des Benutzers. Eine davon ist OAuth, bei der der Jira-Administrator einige Informationen zu DEON in die Jira-Umgebung einbetten muss, damit DEON mit dem Jira-Server „sprechen“ kann. Zuerst muss ein Application Link in den Jira-Produkteinstellungen eingerichtet werden, die normalerweise über die URL atlassian.net/plugins/servlet/applinks/listApplicationLinks zugänglich sind. Diese Seite sollte ähnlich aussehen wie das Bild unten.
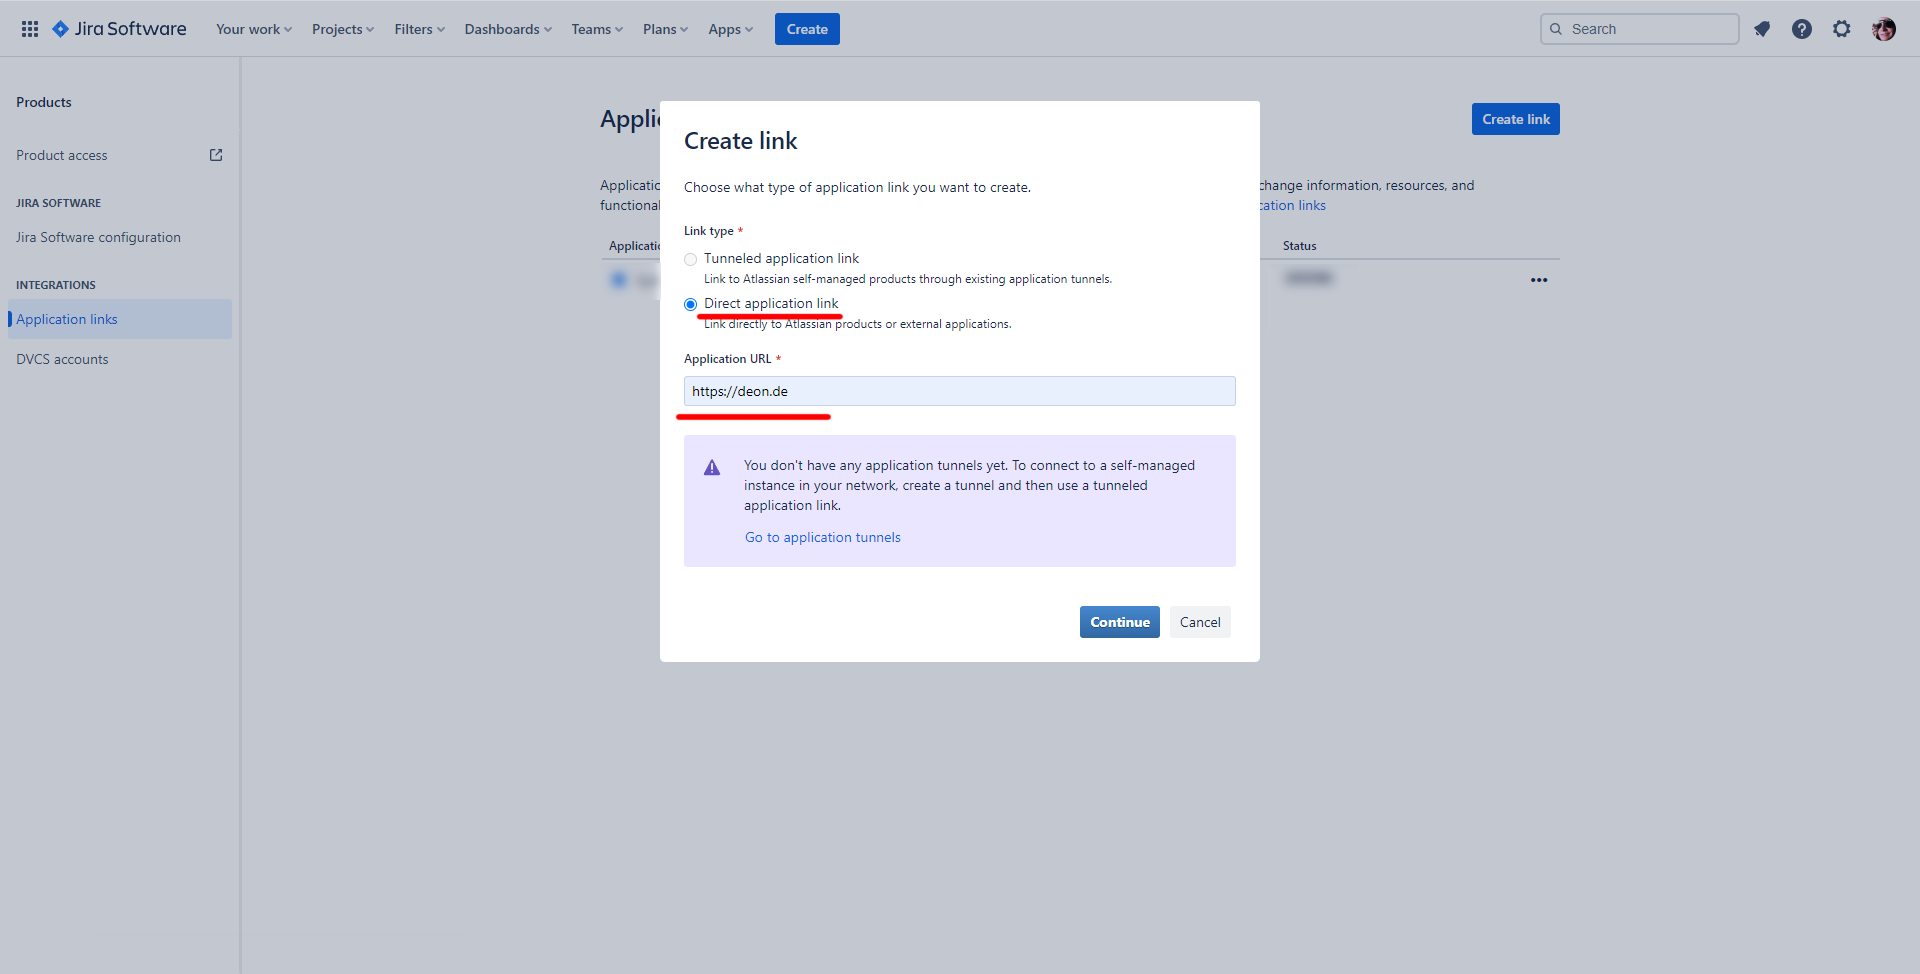
Hier muss ein neuer Application Link erstellt werden. Der Ziel-Link Type sollte auf Direct Application Link gesetzt werden. https://deon.de sollte als Application URL festgelegt werden.
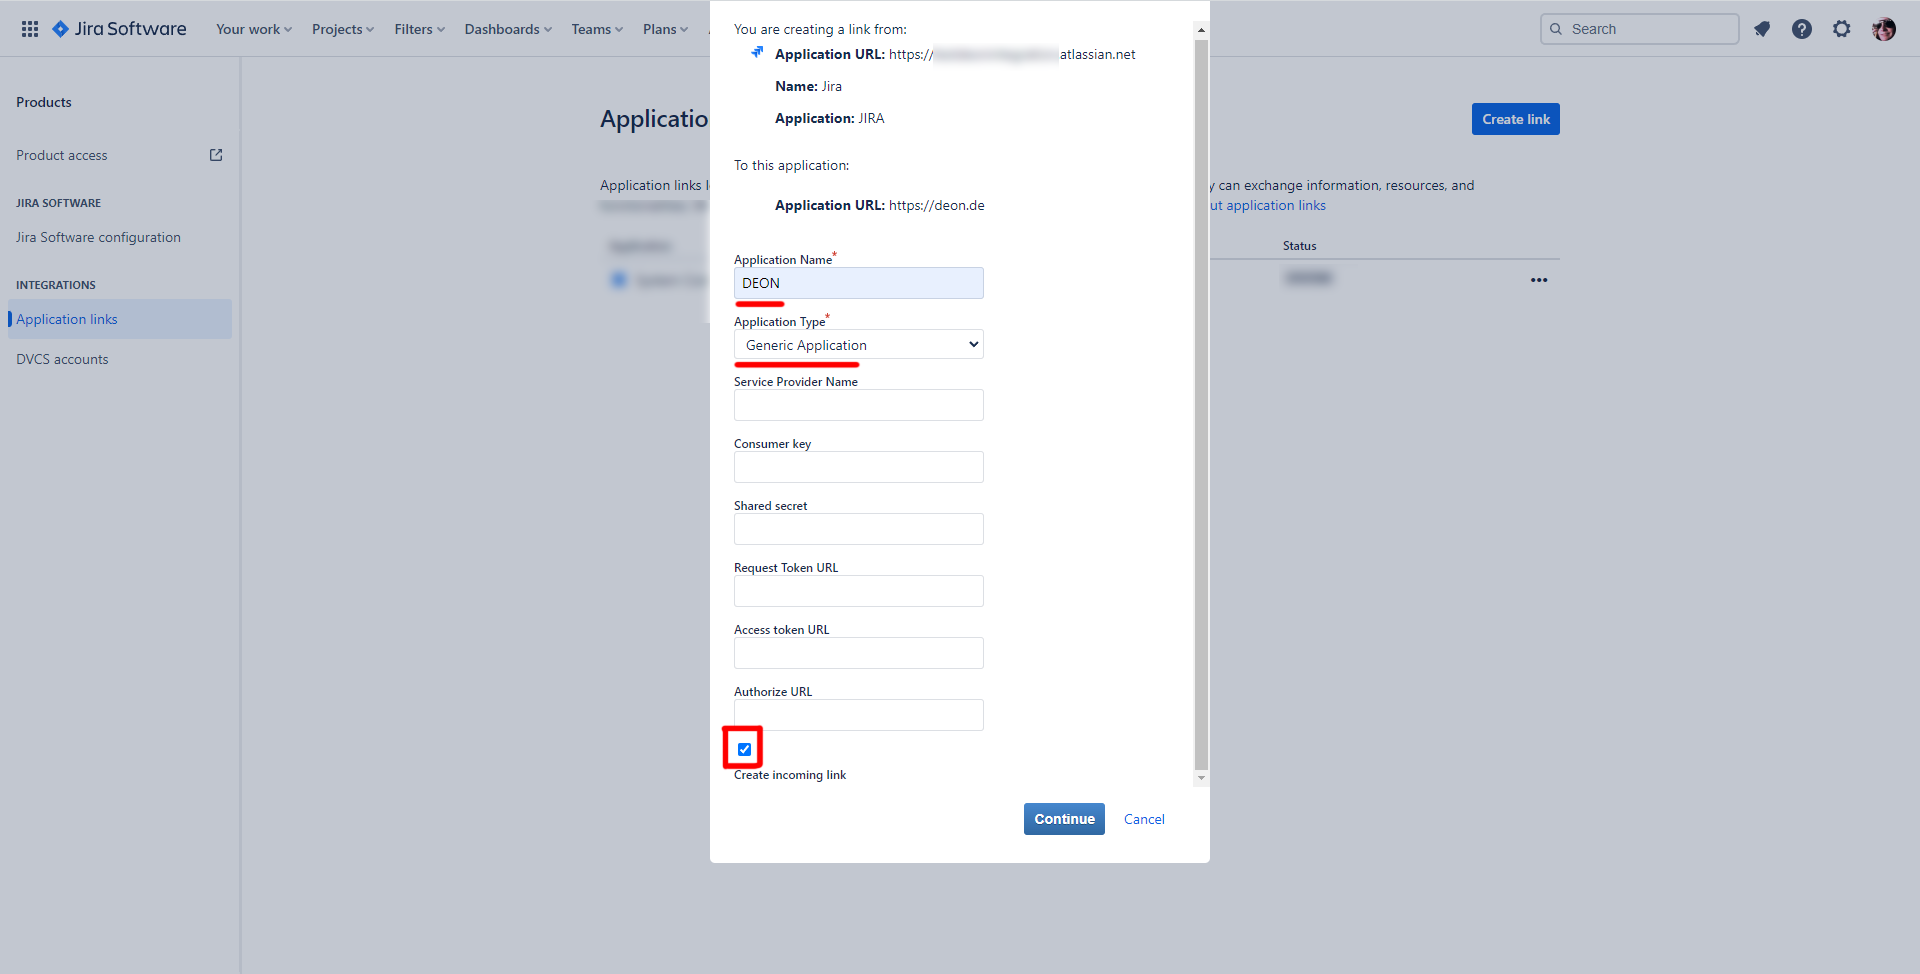
Auf der folgenden Seite müssen ein Application Name und Type angegeben werden. Normalerweise sollte dies auf DEON und Generic Application gesetzt werden. Auch die Option Create Incoming Link muss aktiviert werden.
Schließlich muss der Consumer Key als OauthKey angegeben werden (Achtung: Groß-/Kleinschreibung beachten!), der Consumer Name muss auf DEON gesetzt werden und der Public Key muss mit der unten aufgeführten verschlüsselten Zeichenfolge übereinstimmen. Dieser Wert kann einfach kopiert und eingefügt werden.
MIGfMA0GCSqGSIb3DQEBAQUAA4GNADCBiQKBgQDwbjsh4GEf9NGWSwxvVWodfkCnG5DFhbqvf3+HOrzpEXDCvZBcS58lRz8h7Lb376QXxUoJfogLD//LGooUM02DLOIHbrZcMGWhG34+cbP7UNHppY1/m4AcRfTkXyyFzOBuWfbHYSIYeiE/qYIplWhib8By8rxlUVm9NMjhPp0mrQIDAQAB

Sobald der Application Link erstellt wurde, sollte er auf der Hauptseite aufgeführt sein, wo er auch bearbeitet werden kann. Dieser Schritt schließt das initiale Jira-Setup ab, und DEON kann sich nun, sobald es ebenfalls konfiguriert ist, mit diesem Jira-System verbinden.
Dedicated/Self-hosted/On-Premise
Im Gegensatz zum Cloud-basierten Jira-System unterstützt eine On-Premise-Jira-Umgebung normalerweise nicht das Einrichten von Application Links für OAuth. Stattdessen können sich Benutzer bei DEON authentifizieren, indem sie entweder einen API-Token oder einen Personal Access Token (PAT) erstellen. Wenn die API-Token-Option in den Jira-Einstellungen nicht angezeigt wird, hat der aktuelle Benutzer möglicherweise keine ausreichenden Rechte oder das System unterstützt die API-Token-Authentifizierung überhaupt nicht. Das Erstellen eines PAT sollte auf allen Systemen ab Jira Software 8.14 verfügbar sein und ist unter dem persönlichen Benutzerprofil zu finden.
Initiales Azure®-Setup
Derzeit gibt es keine bekannten Voraussetzungen in Azure, um es in DEON zu integrieren.
Initiales Wrike®-Setup
Wrike verwendet OAuth2 für die Benutzerauthentifizierung und -autorisierung. Damit DEON mit der Wrike-API-Schnittstelle kommunizieren kann, muss die Anwendung zunächst in den Wrike-Anwendungseinstellungen konfiguriert werden. Diese Einstellungen können über Apps & Integration durch Klicken auf das Benutzersymbol in Wrike aufgerufen werden, wie unten gezeigt:
![]()
Auf der dann geladenen Übersichtsseite Apps & Integration muss man Authorized Apps auswählen, was im oberen Navigationsbereich zu finden ist.
![]()
Dieser Link führt zu einem Dashboard, das alle aktuell konfigurierten und damit zugriffsberechtigten Anwendungen auflistet. Ein Beispiel ist unten gezeigt:
![]()
Auf der linken Seite befindet sich ein Link namens API, der das Einrichten neuer Anwendungen ermöglicht. Zuerst muss der Name für die zugreifende Anwendung angegeben werden, dieser sollte vermutlich so etwas wie DEON sein.
![]()
Da alle externen Anwendungen sowie Benutzer OAuth2 verwenden, um Zugriff zu erhalten, werden eine Client ID und ein Client Secret erstellt. Schließlich muss mindestens eine Redirect URI angegeben werden. Diese Parameter sind für den Autorisierungsserver (DEON-Server) erforderlich, der von Benutzern mit administrativen Rechten verwaltet wird. Zur Vereinfachung des Zugriffs dürfen Mandanten auch einen sogenannten Permanent Token generieren, der für eigenständige Einzelbenutzeranwendungen funktionieren würde, aber nicht für Mehrbenutzerszenarien verwendet werden sollte.
![]()
Schließlich müssen alle Änderungen durch Klicken auf die Schaltfläche Save gespeichert werden. Diese neu konfigurierte Anwendung wird nun unter dem linken oberen Link aufgeführt, alle Parameter können jederzeit geändert werden.
Authentifizierungsprozess in DEON
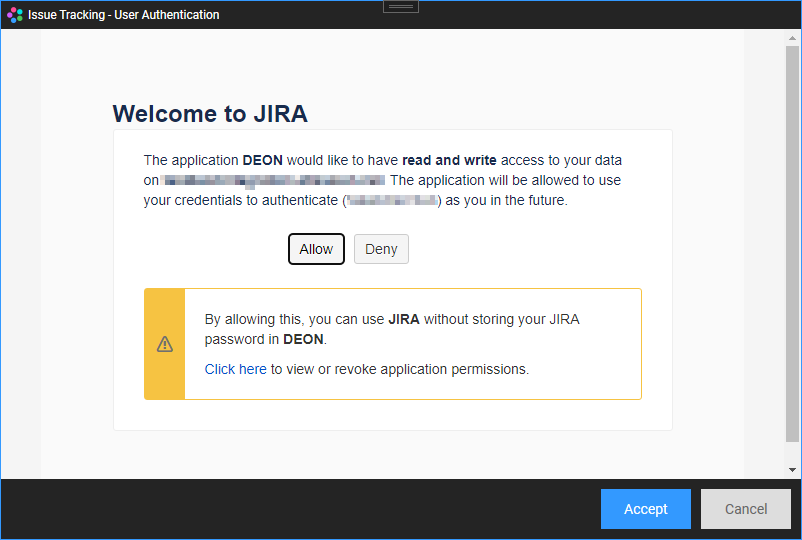
In fast jedem Fall erfordert eine Verbindung zu einem Server, dass sich der Benutzer authentifiziert und DEON autorisiert, auf das Ziel-Tracking-System zuzugreifen. Sobald eine Verbindung im Verbindungs-Setup konfiguriert wurde und der Cache-Erstellungsprozess gestartet wird, versucht diese Verbindung, den Benutzer beim Server zu authentifizieren. Daher identifiziert DEON den Authentifizierungstyp und stellt mehrere Dialoge bereit, um diesen Prozess zu erleichtern.
Authentifizierungsdialog für Azure:
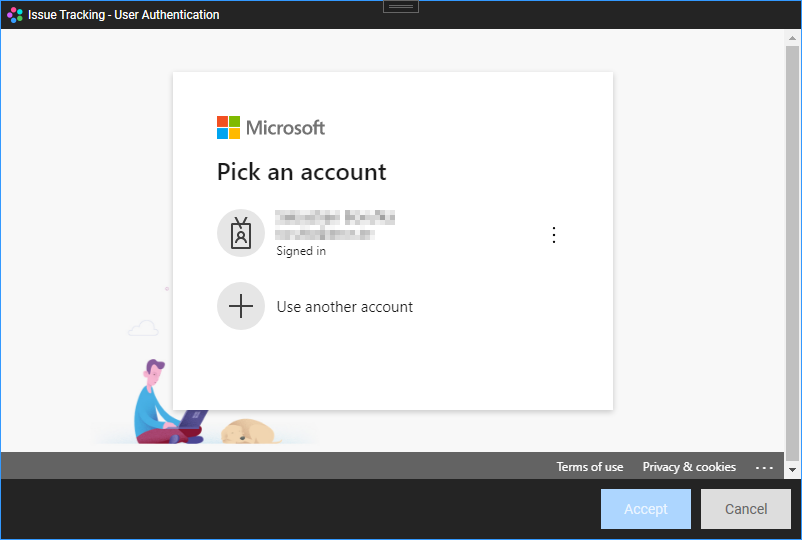
Authentifizierungsdialog für Jira (mit OAuth):
Allgemein (API-Token oder PAT)
Wenn der Authentifizierungstyp auf API-Token oder PAT ausgewählt wurde, sieht der Dialog ganz anders aus, ohne Web-Autorisierungsanfrage. Normalerweise reicht die Kombination aus einem Benutzernamen und diesem Token aus, um den Authentifizierungs- und Autorisierungsprozess vollständig zu bestehen.
![]()
Sobald der Authentifizierungs-/Autorisierungsprozess abgeschlossen und erfolgreich beendet ist, ist diese Verbindung nun aktiv und nutzbar.
In jedem Fall werden alle bereitgestellten Anmeldeinformationen sicher in den DEON-Perimeter-Einstellungen gespeichert, und solange die Authentifizierung/Autorisierung vom Server akzeptiert wird, müssen Sie diese für die Lebensdauer der aktuellen Sitzung nicht erneut eingeben. Sobald die Authentifizierungssitzung abläuft, benachrichtigt DEON den Benutzer, bevor eine Issue-Tracking-Funktionalität verwendet werden kann. In diesem Szenario muss der Authentifizierungsprozess einfach wiederholt werden.
Tickets importieren/erstellen
Neue Tickets können einfach über das Widgets-Menü in der DEON-Hauptmenüleiste erstellt werden, wie unten gezeigt.
![]()
Die Importoption bleibt inaktiv, bis eine gültige Verbindung eingerichtet wurde.
![]() Diese Schaltfläche aktiviert das Tool zur Issue-Erstellung. Klicken Sie irgendwo in das Projekt, um ein Ticket zu erstellen. Ein neuer Dialog erscheint, der Sie durch alle erforderlichen Schritte führt.
Diese Schaltfläche aktiviert das Tool zur Issue-Erstellung. Klicken Sie irgendwo in das Projekt, um ein Ticket zu erstellen. Ein neuer Dialog erscheint, der Sie durch alle erforderlichen Schritte führt.
![]()
Zuerst muss die vorgesehene Verbindung aus dem ersten Dropdown-Menü ganz oben ausgewählt werden, die verwendet wird, um den richtigen Server anzusprechen. Zweitens sollte ein Projekt aus der Liste unten ausgewählt und der Ziel-Issue/Ticket-Typ (z. B. Bug, Task usw.) angegeben werden. Die Angabe einer guten Zusammenfassung ist ebenfalls obligatorisch, da sie als Zusammenfassung/Titel des Tickets dient. Optional können Benutzer auch eine Priorität, einen Bearbeiter und eine Beschreibung hinzufügen. Sobald alle notwendigen Daten eingegeben sind, erstellt ein Klick auf Accept (wenn die Auto-Push-Einstellung aktiviert ist, kann die Schaltfläche Accept And Sync lauten) ein neues Ticket im Workspace. Das neue Widget kann ähnlich aussehen wie die Bilder oben im Abschnitt DEONs integrierte Funktionen, abhängig vom zuletzt ausgewählten Ansichtsmodus.
Vorhandene Tickets können einfach von externen Systemen in Ihr Projekt von jedem verbundenen Server importiert werden, und DEON bietet mehrere Möglichkeiten, dies zu tun.
Massenimport
![]() Eine Option ist der sogenannte Massenimport, der durch Öffnen des Importdialogs im Widgets-Menü in der DEON-Hauptmenüleiste aufgerufen werden kann. Die folgende Ansicht erscheint:
Eine Option ist der sogenannte Massenimport, der durch Öffnen des Importdialogs im Widgets-Menü in der DEON-Hauptmenüleiste aufgerufen werden kann. Die folgende Ansicht erscheint:
![]()
Nach Auswahl der Ziel-Verbindung und des vorgesehenen Projekts wird die Liste der Issues/Tickets automatisch aktualisiert. Standardmäßig findet die Suchabfrage nur alle Elemente, die sich auf das ausgewählte Projekt beziehen.
![]() Dies ermöglicht Benutzern, die Suchabfrage manuell zu bearbeiten.
Dies ermöglicht Benutzern, die Suchabfrage manuell zu bearbeiten.
Bitte beachten Sie: Derzeit gibt es keine Validierungsprüfung auf Syntaxfehler, ungültige Einträge sind möglich und können zu unerwünschten Suchergebnissen führen!
Die Elementliste ermöglicht eine Mehrfachauswahl, sodass Benutzer viele Elemente gleichzeitig importieren können. Sobald alle gewünschten Issues ausgewählt sind, erstellt ein Klick auf Accept ein neues Widget für jedes ausgewählte Issue im Projekt. Standardmäßig werden alle importierten Issues gleich behandelt und daher in einem Rasterlayout platziert. Wenn Issues miteinander verknüpft sind, können Benutzer auch die Anordnung der Tickets in DEON ändern.
![]() Alle ausgewählten Elemente werden in einem gleichmäßig verteilten Raster angeordnet.
Alle ausgewählten Elemente werden in einem gleichmäßig verteilten Raster angeordnet.
![]() Dies platziert übergeordnete Issues/Tickets über ihren verknüpften Kindern.
Dies platziert übergeordnete Issues/Tickets über ihren verknüpften Kindern.
![]() Alle ausgewählten Elemente werden in einer horizontalen Reihe aufgelistet, wobei der gleiche Abstand zueinander eingehalten wird.
Alle ausgewählten Elemente werden in einer horizontalen Reihe aufgelistet, wobei der gleiche Abstand zueinander eingehalten wird.
![]() Dies führt zum gleichen Ergebnis wie oben, jedoch in vertikaler Richtung.
Dies führt zum gleichen Ergebnis wie oben, jedoch in vertikaler Richtung.
Kopieren/Einfügen von URLs
Eine weitere Möglichkeit, externe Issues/Tickets in ein DEON-Projekt zu bringen, ist das Kopieren und anschließende Einfügen der URL des gewünschten Tickets. Wichtig für den Erfolg dieses Vorgangs ist, dass der URL-Link den Projektnamen oder die ID und die Ticket-ID/-Nummer enthält.
Eine mögliche gültige (Azure) Ticket-URL sieht ähnlich aus wie diese: https://dev.azure.com/FirmenName/ProjektName/_workitems/edit/4889/
Import per Drag-and-Drop von URLs aus einem Webbrowser:
Anstatt die URL zu kopieren und einzufügen, können Benutzer auch eine Drag-and-Drop-Operation verwenden, um das Ticket im DEON-Projektraum zu platzieren. Dazu kann die URL angeklickt und vom Browser direkt über DEON gezogen und dort abgelegt werden. DEON erkennt gültige URLs sowohl für die Kopier-/Einfüge- als auch für die Drag-and-Drop-Operationen.
Beide Optionen funktionieren auch innerhalb von eingebetteten Webbrowsern in DEON. Sollten Benutzer zufällig ein Browser-Widget in ihrem Projekt platziert haben, können sie Ticket-URLs per Drag-and-Drop oder Kopieren/Einfügen aus diesem Browser in das DEON-Projekt ziehen, ohne diese URLs zuerst extern öffnen zu müssen.
Bearbeitung und Synchronisation
Klicken Sie auf ein Ticket, um das Kontextmenü zu öffnen. In der unteren Zeile sehen Sie die Issue-Tracking-Optionen.
![]()
![]() Öffnet den Bearbeitungsdialog, der es Benutzern ermöglicht, den aktuellen Workflow-Status, den Bearbeiter, die Priorität und auch den Issue-Beschreibungstext zu ändern.
Öffnet den Bearbeitungsdialog, der es Benutzern ermöglicht, den aktuellen Workflow-Status, den Bearbeiter, die Priorität und auch den Issue-Beschreibungstext zu ändern.
![]() Überträgt ausstehende Änderungen auf den Server.
Überträgt ausstehende Änderungen auf den Server.
![]() Ruft Issue-/Ticketdaten vom Server ab. Bitte beachten Sie: Nicht synchronisierte lokale Daten werden überschrieben!
Ruft Issue-/Ticketdaten vom Server ab. Bitte beachten Sie: Nicht synchronisierte lokale Daten werden überschrieben!
![]() Öffnet die Issue-URL in einem Browser.
Öffnet die Issue-URL in einem Browser.
![]() Die Verwendung dieser Menüschaltfläche schaltet durch mehrere Anzeigeoptionen für das/die ausgewählte(n) Issue(s).
Die Verwendung dieser Menüschaltfläche schaltet durch mehrere Anzeigeoptionen für das/die ausgewählte(n) Issue(s).
Hinweise
Das Tracking-Integrationssystem arbeitet mit einem lokalen Cache, was bedeutet, dass eine bestimmte Menge an Daten gelegentlich vom Server geladen werden muss und verwendet wird, um einen lokalen Datencache aufzubauen. Basierend auf der Benutzerauswahl muss dieser Schritt nach einem wiederkehrenden Zeitplan erfolgen (täglich, wöchentlich usw.). Dieser Prozess kann einige Zeit in Anspruch nehmen und hängt weitgehend von der Anzahl der Projekte ab, die DEON auf dem Server findet.
Als Faustregel können Benutzer erwarten, dass je mehr Projekte von einem Server gesammelt werden müssen, desto mehr Daten zwischengespeichert werden und desto länger dauert es, den Cache-Erstellungsschritt abzuschließen. DEON benachrichtigt den Benutzer, sobald der Vorgang abgeschlossen ist. Während dieser Zeit sind die Tracking-Funktionen nicht verfügbar.