Introduction: What can you do with Follow View?
- Follow other users or let other users follow you while navigating in your Workspace (zooming/panning).
- Create user groups to better manage situations like workshops with many users and breakout sessions.
- Assign areas within your workspace to enable quick and easy navigation and coordinate user groups to specific parts of the workspace.
- Restrict certain users to temporarily prevent them from navigating or editing during situations like breakouts in workshops.
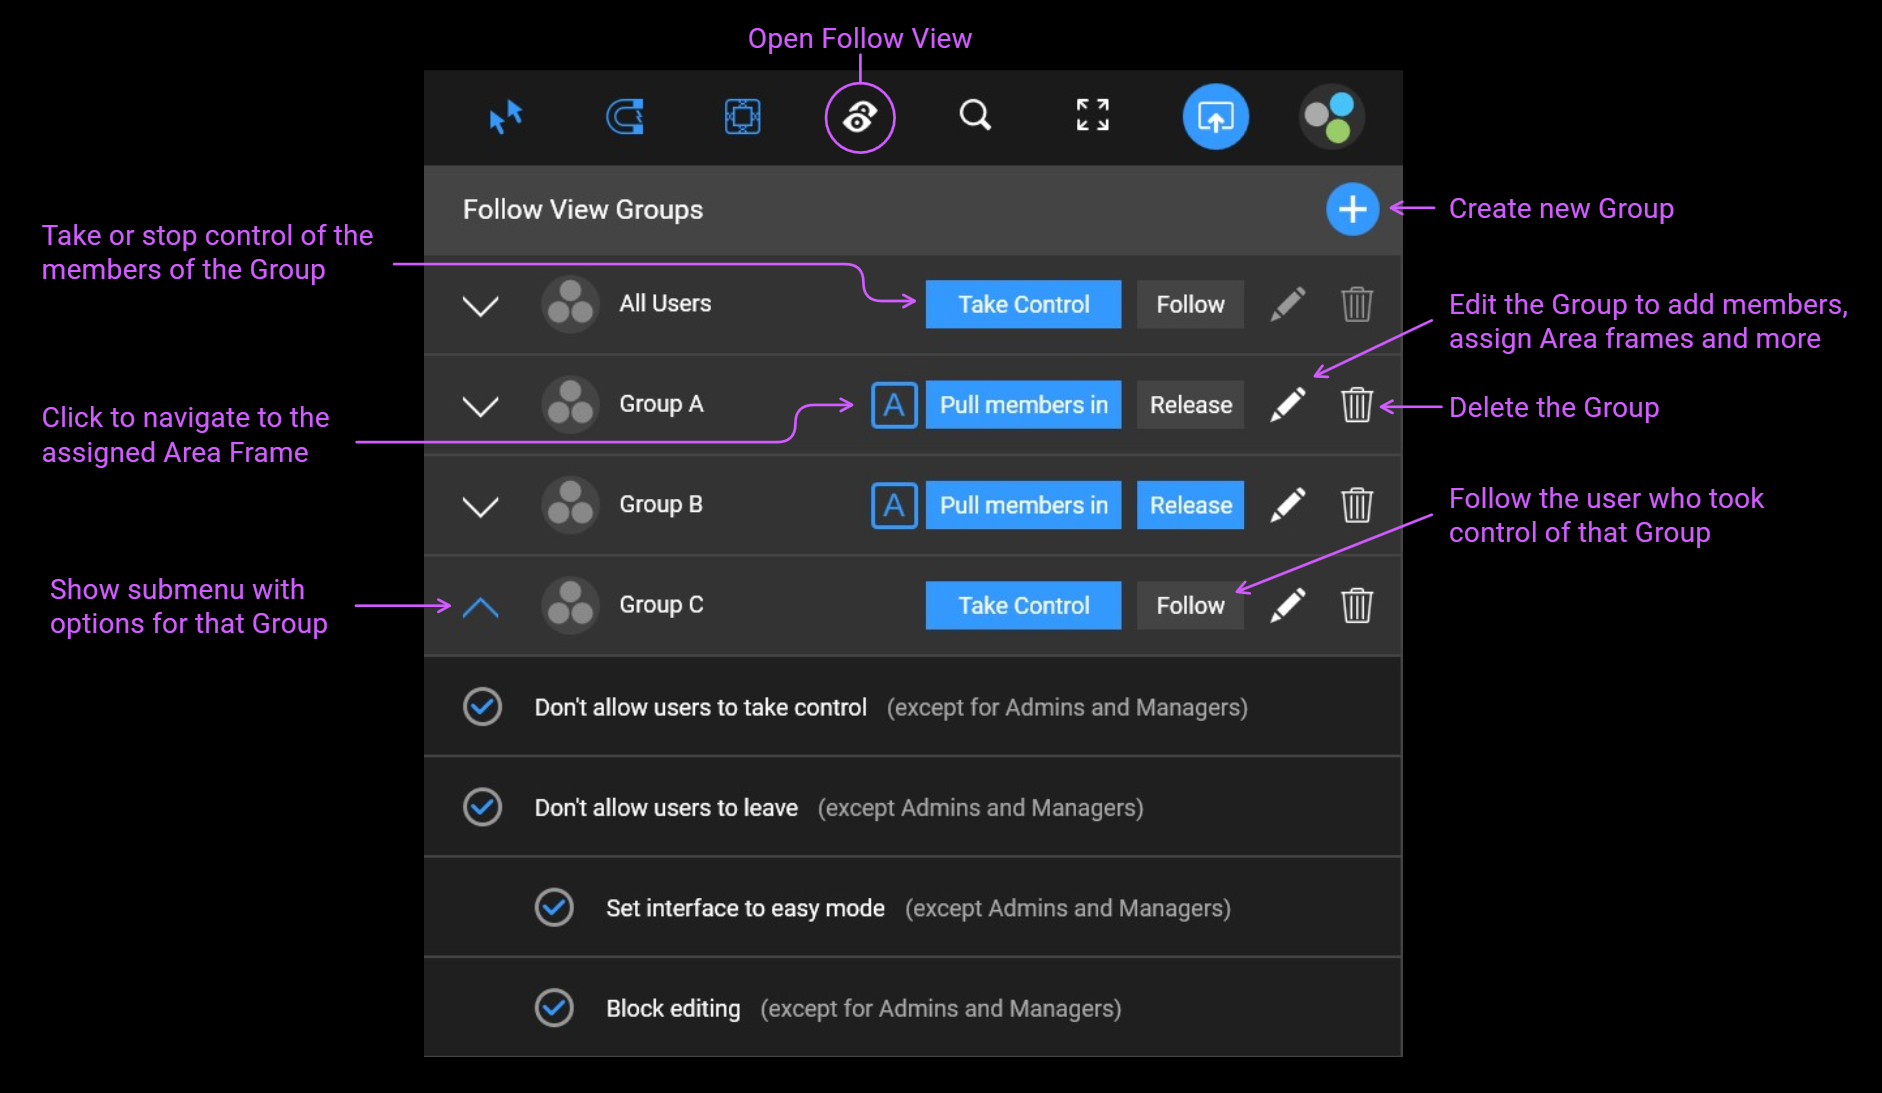
Let other users follow you (take control)
When you click 'Take control' in the default group of the Follow View menu, all users who have opened the same project will follow your navigation and see the same part of the workspace as you.
If they open the project after you've taken control, they'll also follow you immediately.
To stop control, press “Stop control” in the Follow View menu.
Note: Users with read-only permissions cannot take control. They can only follow or stop following.
Unfollow another user
If a user has taken control and you don't want to follow, click 'Leave' in the Follow View menu.
Note: A user with admin or manager rights can prevent you from leaving if you only have viewer or editor rights.
Create user groups
If you want to control only specific users, you can create groups by pressing the blue + button.
A dialog allows you to add users to the group. Press “Create” to complete the process.
Prevent users from taking control
Especially when managing larger user groups, you may not want them to take control over other users.
If you have admin or manager rights, you can prevent users from taking control while you are in control:
Open the submenu of a group (arrow down left) and enable the option “Don’t allow users to take control”. Whenever you take control of this group (by pressing the “Take Control” button), other users cannot take control.
Note: Only users with view or edit rights are affected. Users with manager or admin rights can always take control.
Prevent users from leaving while you are controlling them
If you have admin or manager rights, you can prevent users from leaving while you are controlling them. This forces them to follow your view until you end the control.
Open the submenu of a group (arrow down left) and enable the option “Don’t allow users to leave”. Whenever you take control of this group (by pressing the “Take Control” button), other users cannot leave.
Note: Only users with view or edit rights are affected. Users with manager or admin rights can always leave.
Define areas and assign groups (Table of contents for projects)
You can use Area Frames to subdivide your project into multiple areas. If you assign these areas to groups, you can use the Follow View dropdown like a table of contents. A click on a group in the dropdown then navigates you to the corresponding Area Frame in the Workspace.
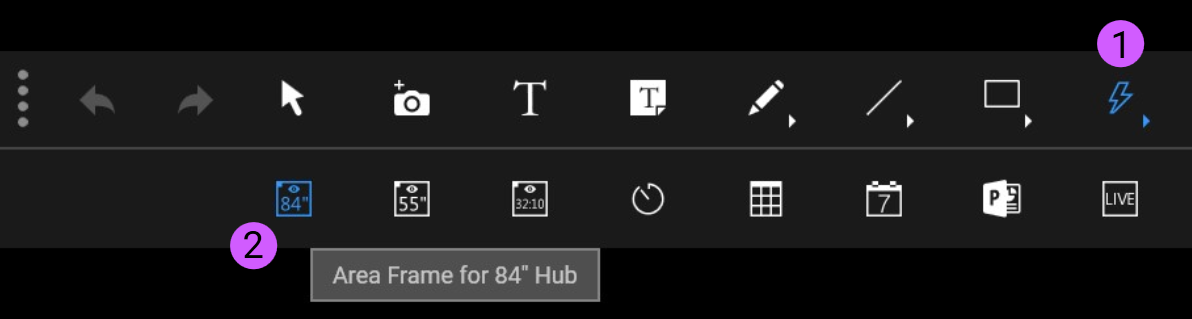
You have two options to create an Area Frame:
Either open the “Widgets” menu in the main menu and select one of the three Area Frame buttons on the far left. Then click into the Workspace. You can freely move the Area Frame in the Workspace and change its size.
Optionally, you can create Area Frames directly from the group dialog:
Press the “Edit” button (pencil icon) of a group. Switch the mode to “Use a defined Area Frame…”. Click on “Create Area Frame”.
To assign any Area Frame to a group, edit the group and click "Select Area Frame".
To navigate to an Area Frame, simply click on the “A” button in a group or double-click on the group name.
You can reorder the list of groups by dragging a group up or down.
Navigate users to specific Area Frames (Pull members in)
If you want to navigate all users there, you can simply navigate there yourself (e.g. by clicking the "A" button of a group that has an Area Frame assigned) and then press "Take control" in the "All users" group at the top of the Follow View menu.
If you only want to navigate certain users to a specific Area Frame, add these users to the corresponding group (by editing the group and adding users) and then press the "Pull members in" button.
All members of this group will then be immediately navigated to the assigned Area Frame.
You can immediately navigate away if you haven't set the "Don't allow users to leave" option.
Force specific users to stay within a specific area of your project (Activated Area Frame)
You may want certain users to be restricted to a specific area of your project. They can navigate freely within this area, but they cannot leave this area to view or modify content outside of it.
To do this, simply activate “Don’t allow users to leave” in the submenu of a group (arrow pointing down left).
To release the users again, press the “Release” button for this group.
Note: If "Don't allow users to leave" is enabled for a group and some members of this group open the project later, after you've pressed "Pull members in", they will be pulled in directly as soon as they load the project. If "Don't allow users to leave" is not enabled, nothing will happen to users who open the project later.
Note: Only users with view or edit rights are affected. Users with manager or admin rights are not limited to the Area Frame.
Prevent users from editing content
You may want to temporarily prevent users from making changes in the Workspace.
To do this, activate “Block editing” in the submenu of a group (arrow pointing down left).
Editing will be blocked for all members of this group in the following situations:
- While you take control of this group (when you end control, members can edit again).
- If this group is assigned an Area Frame: While members are pulled into this Area Frame with the option “Don’t allow users to leave”.
Note: Only users with editing rights are affected. Users with manager or admin rights can continue to edit. Users with display rights can never edit, of course.
Set interface to easy mode
When conducting workshops with inexperienced users, you may want to hide unnecessary options and buttons from them. You can switch their user interface to Easy Mode, which has fewer buttons and features available and disables DEON keyboard shortcuts. This makes it easier for participants and less likely that one of them will do something unexpected that could disrupt your session.
To do this, activate 'Set interface to easy mode' in the submenu of a group (arrow down left).
Easy Mode is activated for all members of this group in the following situations:
- While you take control of this group (When you stop control, members return to normal mode).
- If this group is assigned an Area Frame: While members are pulled into this Area Frame with the option “Don’t allow users to leave”.
Note: Only users with view or edit permissions are affected. Users with manager or admin rights always remain in full mode.