Overview
DEON offers a flexible alternative to traditional issue tracking systems by combining visual clarity, contextual awareness, and seamless integration of live content. Whether used alone or as a complement to tools like Jira or Azure DevOps, DEON enables teams to organize and manage tasks the way they actually work together - visually, dynamically, and in context.
The integrated issue tracking system can be used independently, but also enables users to connect external systems like Jira or Azure for both cloud-based and dedicated server scenarios.
Issues, tasks, bugs, and more can be created, content and properties changed, and synchronized with the server. Mass import from Jira and Azure DevOps is supported, as is inserting issue URLs or dragging elements from your browser directly onto the project canvas.
The DEON Holistic Intelligence option is compatible with all issue tracking modes. This enables context-related use of AI across issue tracking workflows and supports both AI services provided by DEON and custom AI endpoints hosted internally in your organization.
Features
- Use powerful tools in DEON to track issues, tasks, goals, and more
- Connect easily with Atlassian Jira®, Microsoft® Azure® DevOps, and Wrike®
- See your projects at a glance
- Create new tickets and edit them in no time
- Import individual elements, a bulk list, or from a filtered collection
- Powerful search query language
- Synchronize your work with your server with one click
- Organize your elements with multiple built-in layouts
- Create your own templates and share them with your team or organization
- Full AI integration via the DEON Holistic Intelligence Multimodal Kernel (HMK)
Comparison DEON vs. Jira and Azure DevOps
1. Independent Issue Tracking with DEON
DEON's integrated issue tracking is optimized for teams that need a lightweight, visual approach without the overhead of complex workflows or rigid structures.
Example scenario:
A product team conducts a weekly planning session. Tasks are spatially mapped by functional area, linked to specifications on SharePoint, and grouped with design mockups and feedback notes. The team can see what needs to be done, understand the context, and act immediately.
Main strengths:
- Visual organization of tickets – by priority, topic, owner or schedule.
- Embedded live links to cloud storage (e.g., SharePoint, OneDrive) ensure documents remain up-to-date and duplicates are avoided.
- Enables flexible, ad-hoc workflows tailored to team preferences.
- Particularly well-suited for agile, cross-functional teams and projects in the early phase.
2. DEON combined with Jira or Azure DevOps
In more structured environments DEON extends traditional tools by serving as visual and collaborative interface on Jira or Azure DevOps serves. It provides teams and stakeholders a clearer understanding of the data – without losing the benefits of enterprise systems.
Example scenario:
Während a PI planning session, a Delivery Manager embeds live Jira queries into DEON. Around it, the canvas enthält architecture diagrams, Geschäftsziele and team notes. Stakeholders können dependencies, priorities and compromises recognize instantly, without switching tools or losing context.
Main strengths:
- Live embedding of Jira or Azure DevOps views (e.g., ticket queries, boards, dashboards).
- Improved meeting flow and stakeholder engagement through a single, interactive multi-user canvas.
- Ability to combine structured ticket data with visual elements like mind maps, user flows, or reference materials in documents or embedded websites
- Helps bridge the gap between delivery teams and business stakeholders.
Linked data without redundancy
The DEON canvas supports direct embedding of documents and resources from platforms such as SharePoint, OneDrive, Notion or Confluence – not as static copies, but as live linked content. This ensures that teams always work with the most up‑to‑date information, avoiding version conflicts and reducing unnecessary duplicate copies across tools.
Key benefits of using DEON for issue tracking
- Visual overview: Organize and navigate issues spatially and gain a clearer understanding of priorities and relationships.
- Contextual Integration: Combine tickets with specifications, diagrams or dashboards ‗ live embedded in the workspace.
- Flexible Structuring: Adapt your setup to your workflow, not the other way around.
- Reduced tool switching: Access Jira, SharePoint, or DevOps content directly in DEON.
- Improved Collaboration: Real-time and asynchronous editing on a shared, interactive canvas.
- Better Alignment: Especially valuable in hybrid environments where different roles need different views of the same data.
- AI-ready: Compatible with DEON Holistic Intelligence and custom AI endpoints for context-sensitive support in issue tracking.
DEON's integrated functions
DEON provides a ready-to-use issue-tracking system that allows users to create and manage items based on several predefined configurations.
Note: No setup is required to use the integrated issue tracking.
New tickets can be easily created via the Widgets menu in the DEON main toolbar, as shown below.
![]()
Note: The import button is only available for combined issue tracking with Jira, Azure DevOps or Wrike.
![]() The "Create Issue" button activates the issue creation tool. Click anywhere in the project to create a new ticket at that position. A dialog appears, guiding you through all the necessary steps.
The "Create Issue" button activates the issue creation tool. Click anywhere in the project to create a new ticket at that position. A dialog appears, guiding you through all the necessary steps.
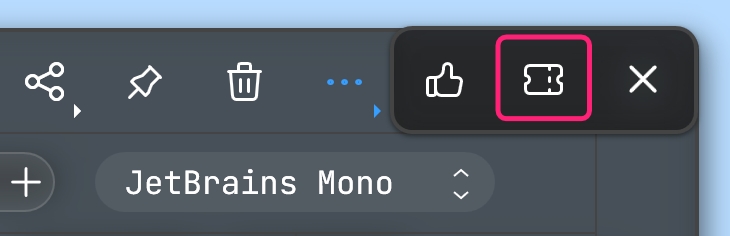
Tip: You can also convert normal text elements like sticky notes into issue tracking tickets. Simply select one or more text elements in the Workspace. Go to the three-dot menu in the upper right corner and click on the issue tracking button, as shown in the screenshot below.
Tip: You can also import tickets from Excel. First, open your Excel file with MS Excel and select the cells that contain the summary text of the tickets. Copy/paste (Ctrl+c/Ctrl+v) them into the DEON Workspace. This will create one sticky note per cell. Then select all these sticky notes and convert them into tickets by clicking on the issue tracking button in the three-dot menu in the upper right corner of the context menu (as described above).
Currently, two different project types are available for selection. Choosing one or the other controls the associated metadata selection options such as issue types, priorities, workflow status, etc. DEON also allows selecting an assignee from the current DEON project members.
This shows the Create-dialog and issue/ticket cards that were created with the integrated system:
![]()
![]()
As shown above, users can specify common attributes such as a defining issue type, summary, description, priority, and assignee. DEON automatically generates an ID for each new issue. After creation, a new ticket appears in the DEON Workspace, containing all specified data as well as some easily distinguishable colors.
When you select one of these tickets, users receive a context menu that also includes options for editing, as shown below.
![]()
![]() This opens the editing dialog, which allows users to change the current workflow status, assignee, priority, and issue description text.
This opens the editing dialog, which allows users to change the current workflow status, assignee, priority, and issue description text.
![]() The use of this toggle button cycles through multiple display options for the selected Issue(s). It can be set to Card (as shown above),
The use of this toggle button cycles through multiple display options for the selected Issue(s). It can be set to Card (as shown above),
on Line : ![]()
or to Minimal set:
![]()
Each ticket contains multiple pieces of information listed below.
![]()
- This symbol indicates which project it belongs to or, if the tracking project does not specify a symbol, which tracking system is used to create this issue.
- This contains the project name.
- This identifier represents the ID of the issue. For external systems, a click on it opens the ticket URL in a browser.
- This contains the underlying issue type.
- The icon indicates the current synchronization status and indicates whether the selected issue needs to be updated or has changes that have not yet been transferred to the server.
- Assignee's name (if specified in the issue details).
- The priority or severity of this issue.
- The current workflow status.
- The summary or description of the tickets. The button to the left of it allows switching between description and summary.
Initial DEON Preparation for Combined Issue Tracking
If you want to connect DEON with Jira, Azure DevOps or Wrike, the combined issue tracking system must be activated in the settings. This is not required if you only want to use the integrated issue tracking.
Note: Issue-tracking settings apply to a DEON project. Different projects can have different issue-tracking settings. If you share your DEON project, other users do not need to set up these settings unless they also want to synchronize or import issues from the external system (Jira, Azure DevOps, or Wrike). The tickets you create, import, or synchronize in a DEON project are always visible and editable for other users in the project (if users have edit rights for the DEON project). If a user changes a ticket in the DEON workspace, it is not automatically synchronized with the external system until a user who has configured the issue-tracking settings triggers the synchronization. This process is below in detail explained.
![]() ÖOpen the DEON settings field by clicking the gear icon in the upper left corner of DEON.
ÖOpen the DEON settings field by clicking the gear icon in the upper left corner of DEON.
The image below shows the required option that must be enabled.
![]()
Once this is activated, DEON must be restarted. Afterwards, the same settings dialog displays advanced options regarding the configuration of the system and potential connections to other (external) tracking systems like Azure or Jira.
![]()
The second tab at the top of this configuration page enables setting up new connections. The dropdown menu offers by default only the option Custom. This means that users must define all connection parameters manually. On supported dedicated DEON platforms this menu contains additional options with pre‑configured connections for which the DEON server provides all required data.
![]()
Adding a new empty connection by clicking on the plus symbol ![]() generates the following result.
generates the following result.
![]()
Expanding the newly created item in the list shows all configuration options of the selected connection. Each connection has some mandatory or required attributes and some optional ones. For example, each connection requires a recognizable Name, a Address of the remote server, a selection of the intended System and the Environment as well as the target-Authentication mode. Additionally, users can check the box for Client certificates to enable it, if the server requires one or more, and a list of project filters to specify, limiting the scope of what DEON accesses on the remote system.
![]()
![]()
![]() This option allows loading saved connection configuration data from a local file.
This option allows loading saved connection configuration data from a local file.
![]() This allows saving all provided connection configuration data to a local file.
This allows saving all provided connection configuration data to a local file.
![]() Users can click on this icon to manually log off from the selected connection.
Users can click on this icon to manually log off from the selected connection.
Each connection per project to an external system must be added and configured on this configuration page in the DEON settings dialog. Once users have finished adding and configuring data, the dialog must be accepted by clicking OK, and DEON will begin downloading the required metadata from the specified server address. DEON also creates a local data cache, which is used to minimize the number of server requests and maximize the speed when working with the selected connection.
Initial Jira Setup
The amount of required settings for Jira integration depends on whether the intended system is a cloud-based Jira (hosted by Atlassian) or a dedicated, so-called On-Premise system, hosted and maintained by the user.
Cloud-based
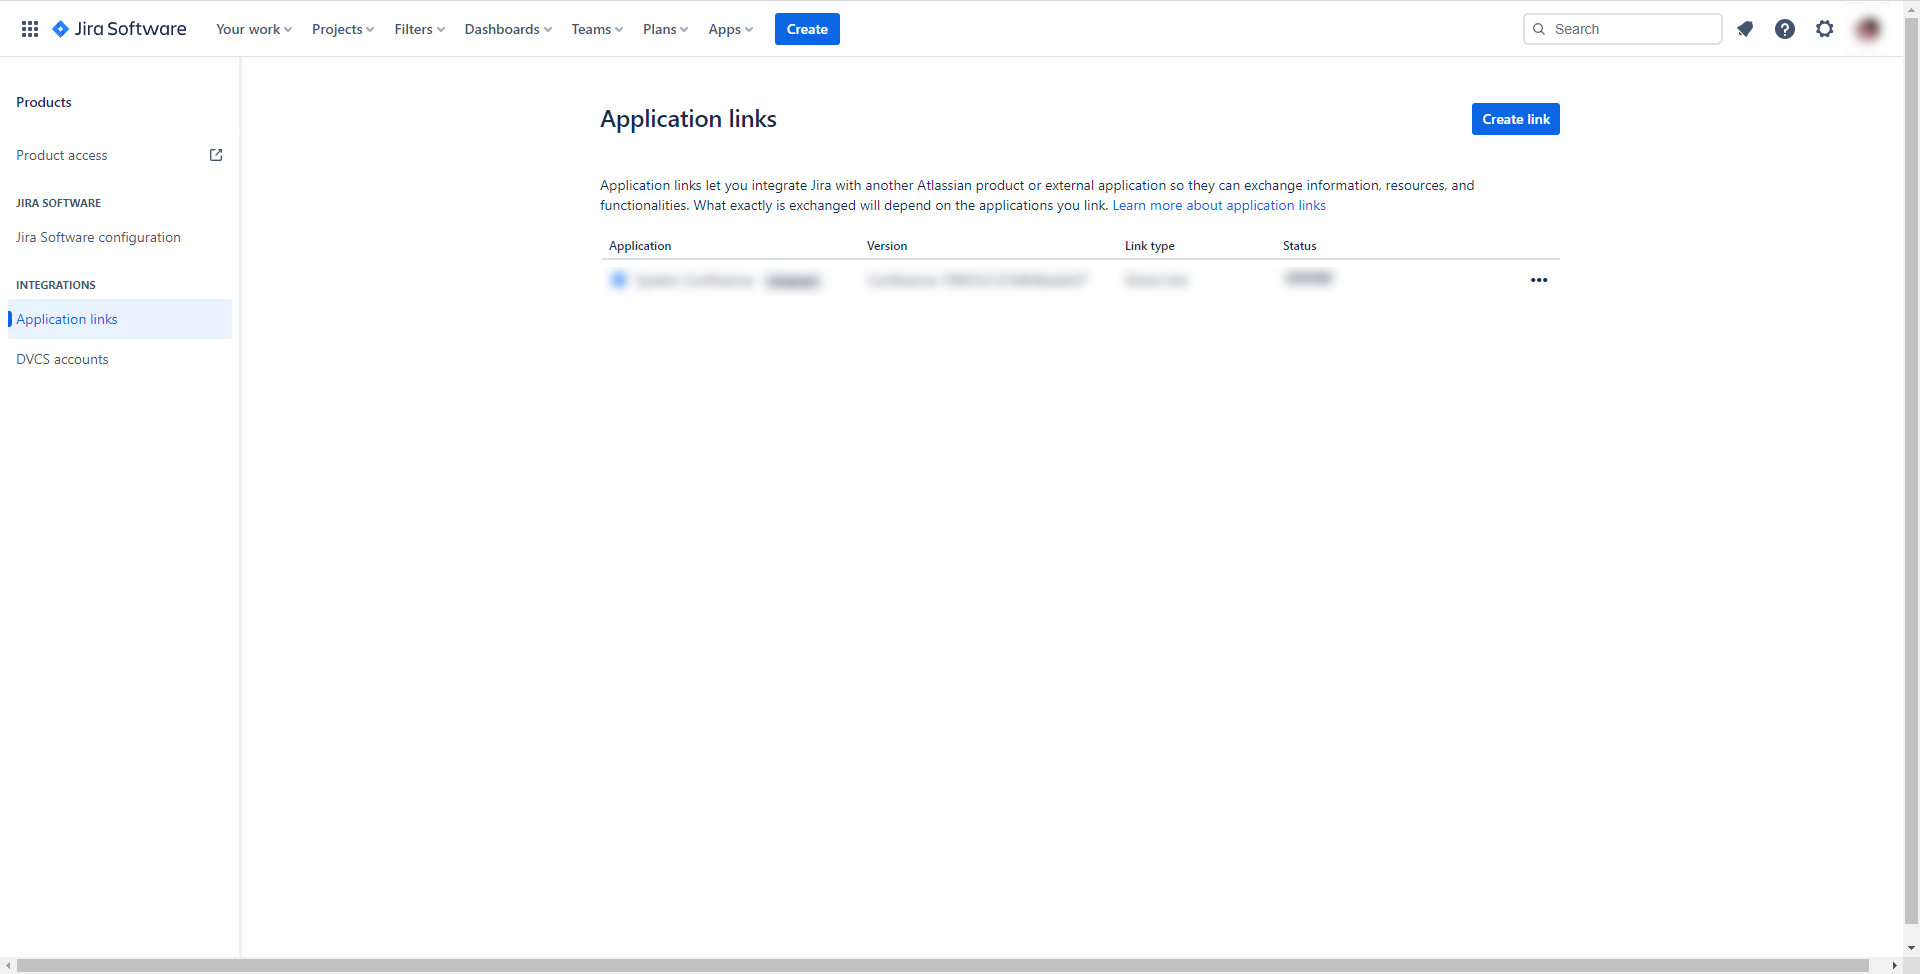
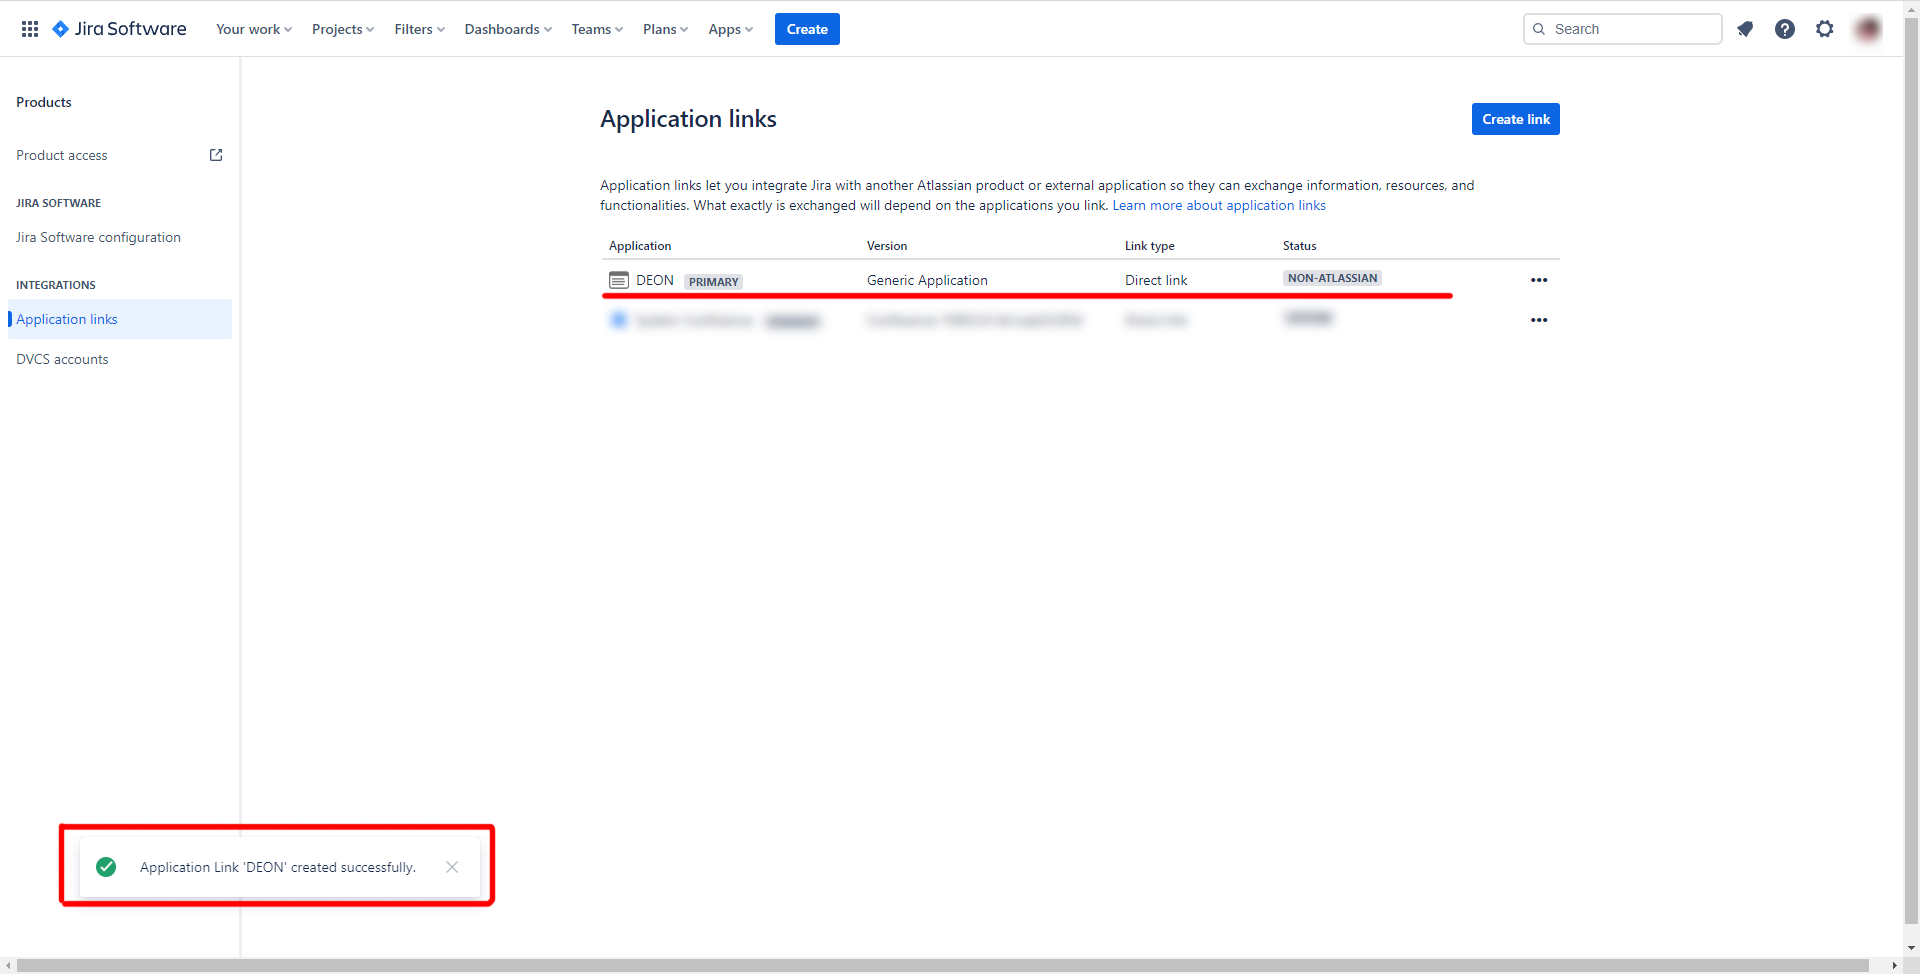
The cloud-based Jira system currently offers several options for user authentication. One of them is OAuth, where the Jira administrator must embed some information about DEON into the Jira environment so that DEON can „speak“ with the Jira server. First, a Application Link be set up in the Jira product settings, which are normally accessible via the URL atlassian.net/plugins/servlet/applinks/listApplicationLinks are accessible. This page should look similar to the image below.
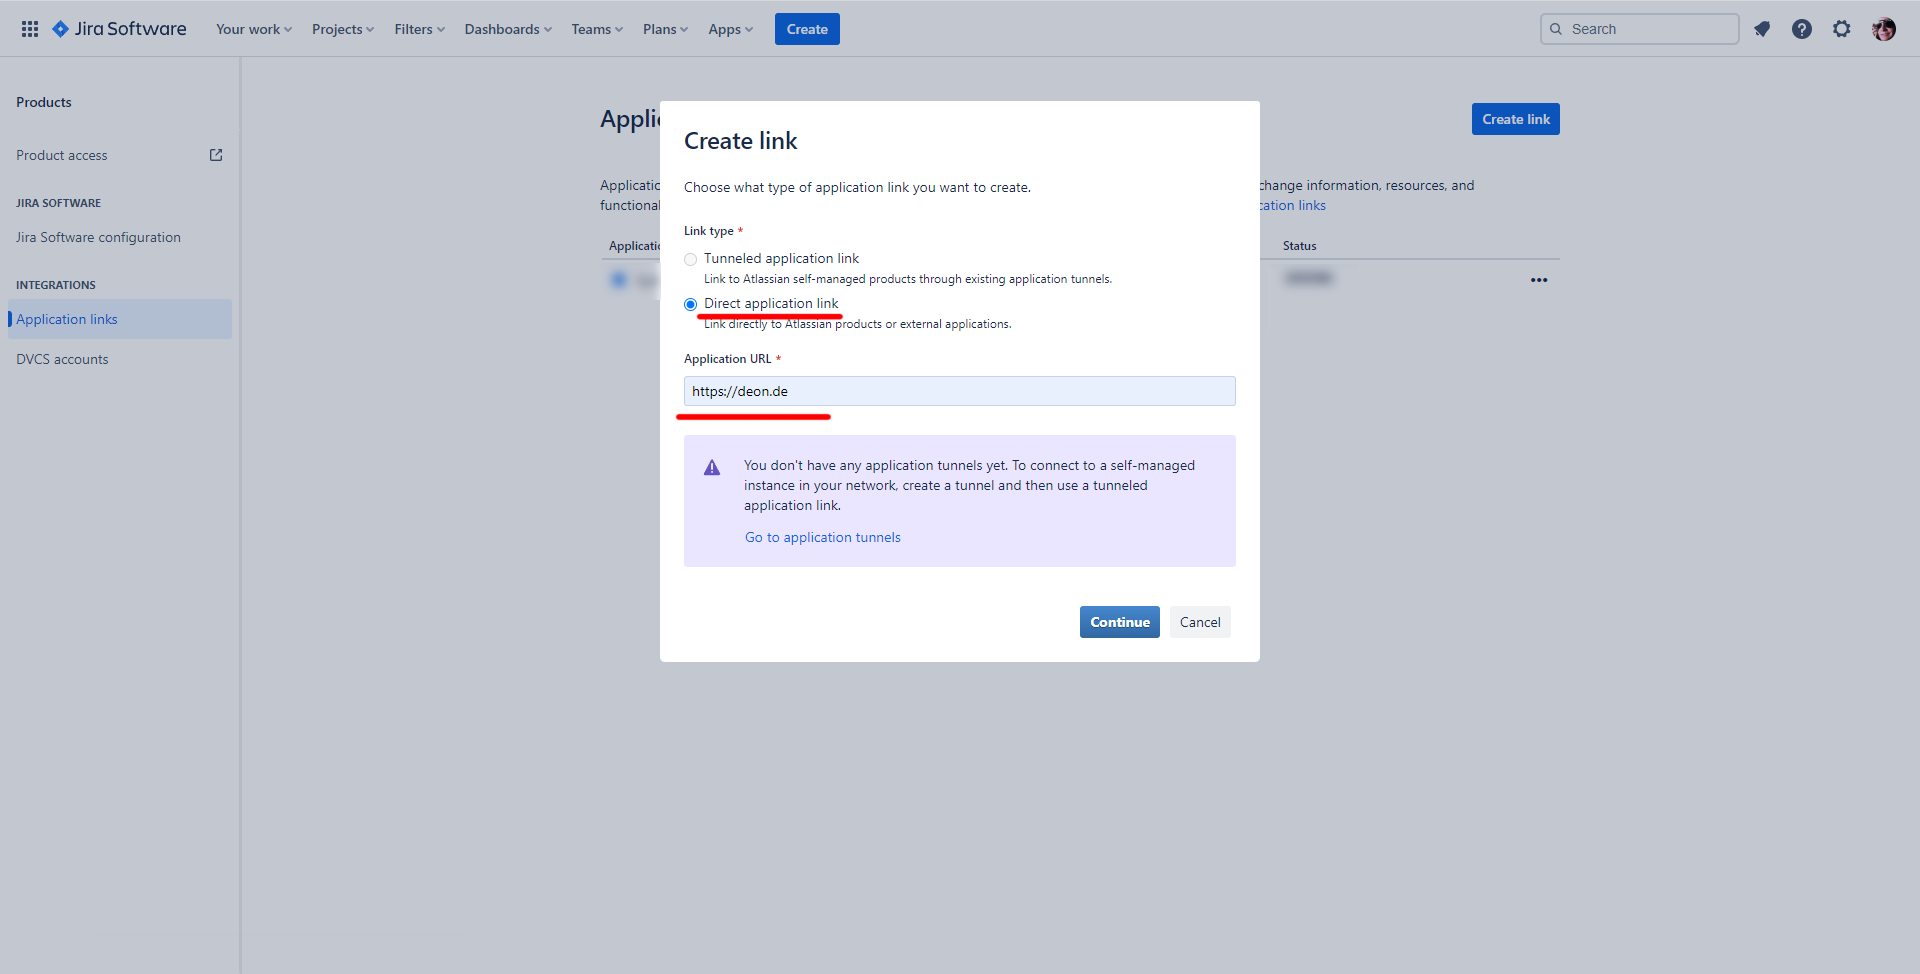
Here, a new application link must be created. The target link type should be set to direct application link . https://deon.de should be specified as the application URL .
On the following page, an Application Name and Type must be specified. Normally this should be set to DEON and Generic Application must be set. Also the option Create Incoming Link must be enabled.
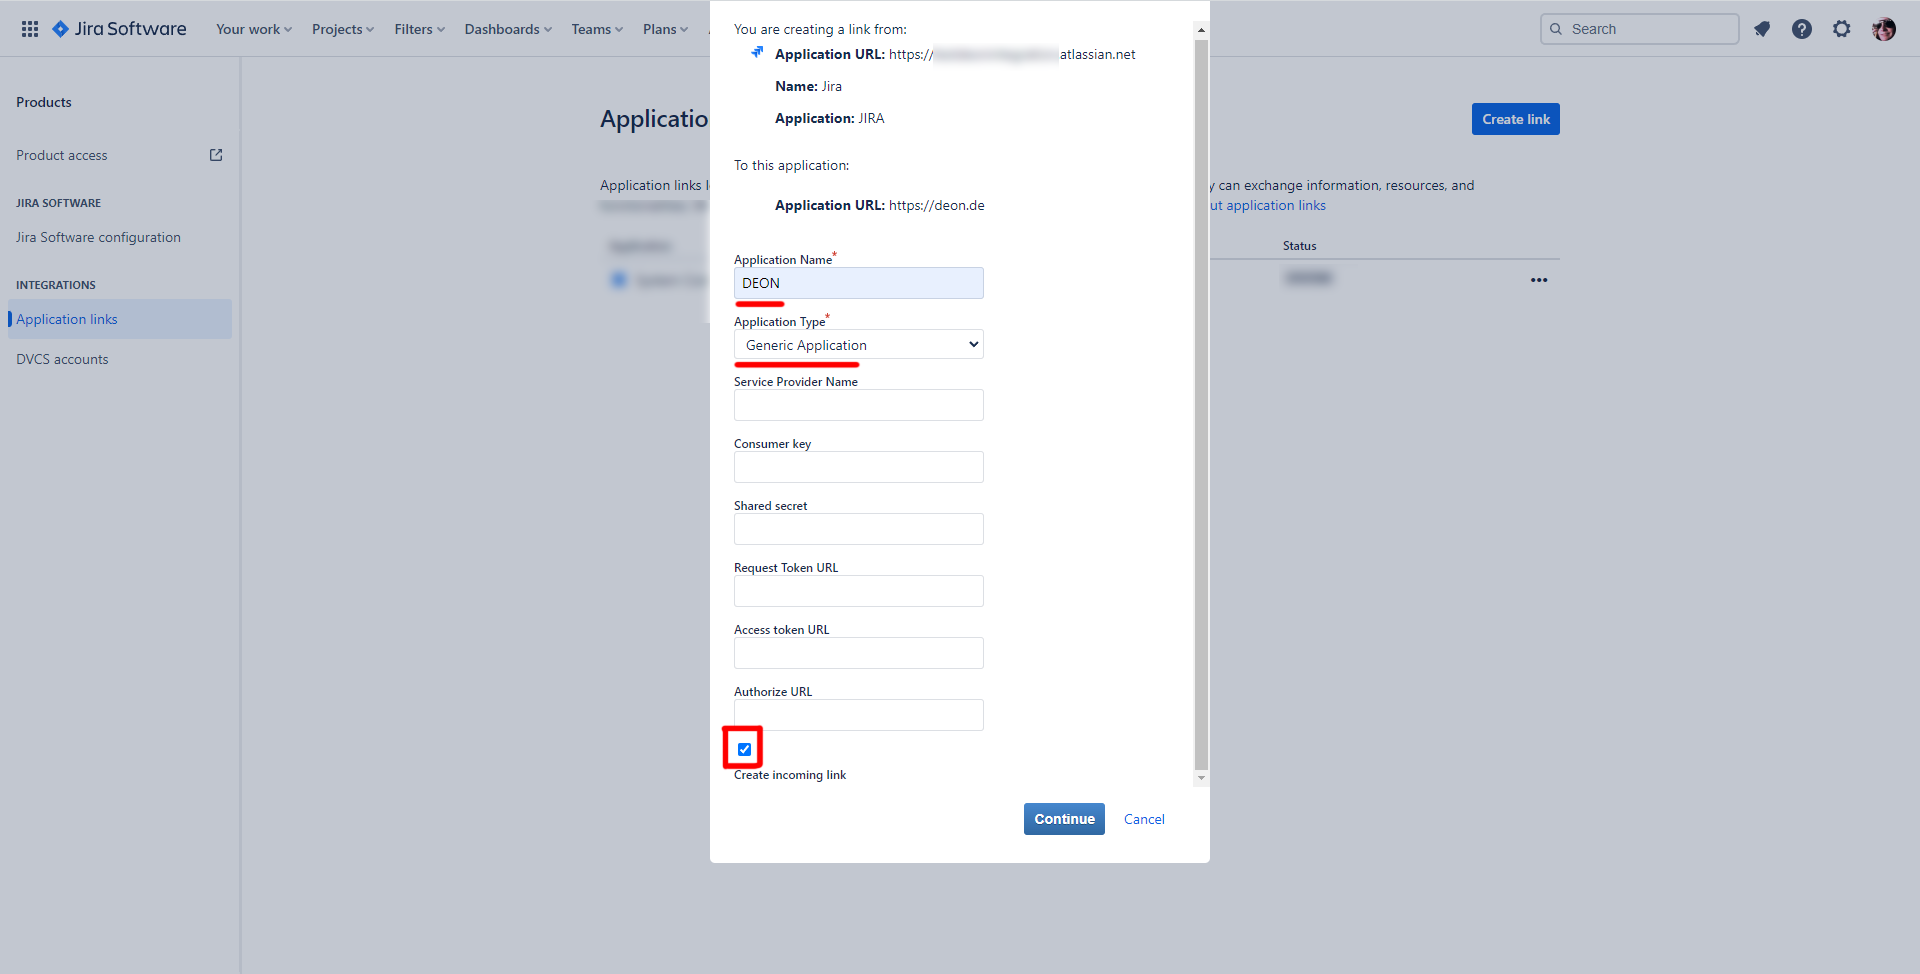
Finally, the Consumer Key as OauthKey must be specified (Note: case sensitivity matters!), the Consumer Name must be set to DEON set and the Public Key must match the encrypted string listed below. This value can simply be copied and pasted.
MIGfMA0GCSqGSIb3DQEBAQUAA4GNADCBiQKBgQDwbjsh4GEf9NGWSwxvVWodfkCnG5DFhbqvf3+HOrzpEXDCvZBcS58lRz8h7Lb376QXxUoJfogLD//LGooUM02DLOIHbrZcMGWhG34+cbP7UNHppY1/m4AcRfTkXyyFzOBuWfbHYSIYeiE/qYIplWhib8By8rxlUVm9NMjhPp0mrQIDAQAB

Once the application link has been created, it should be listed on the main page, where it can also be edited. This step completes the initial Jira setup, and DEON can now connect to this Jira system once it is also configured.
Dedicated/Self-hosted/On-Premise
Im Gegensatz zum Cloud-basierten Jira-System unterstützt eine On-Premise-Jira-Umgebung normalerweise nicht das Einrichten von Application Links für OAuth. Stattdessen können sich Benutzer bei DEON authentifizieren, indem sie entweder einen API-Token oder einen Personal Access Token (PAT) erstellen. Wenn die API-Token-Option in den Jira-Einstellungen nicht angezeigt wird, hat der aktuelle Benutzer möglicherweise keine ausreichenden Rechte oder das System unterstützt die API-Token-Authentifizierung überhaupt nicht. Das Erstellen eines PAT sollte auf allen Systemen ab Jira Software 8.14 verfügbar sein und ist unter dem persönlichen Benutzerprofil zu finden.
Initial Azure Setup
Currently, there are no known prerequisites in Azure to integrate it into DEON.
Initial Wrike Setup
Wrike uses OAuth2 for user authentication and authorization. To allow DEON to communicate with the Wrike API interface, the application must first be configured in the Wrike application settings. These settings can be accessed via Apps & Integration by clicking the user icon in Wrike, as shown below:
![]()
On the subsequently loaded overview page Apps & Integration one must Authorized Apps select, which is located in the upper navigation area.
![]()
This link leads to a dashboard that lists all currently configured and thus authorized applications. An example is shown below:
![]()
On the left side there is a link called API, which enables setting up new applications. First, the name for the accessing application must be provided, this should probably be something like DEON.
![]()
Since all external applications as well as users OAuth2 use to obtain access, a Client ID and a Client Secret is created. Finally, at least one Redirect URI must be specified. These parameters are required for the authorization server (DEON-Server), which is managed by users with administrative rights. To simplify access, tenants may also generate a so-called Permanent Token generate, which would work for standalone single-user applications, but should not be used for multi-user scenarios.
![]()
Finally, all changes must be saved by clicking the button Save be saved. This newly configured application will now be listed under the top left link, and all parameters can be changed at any time.
Authentication Process in DEON
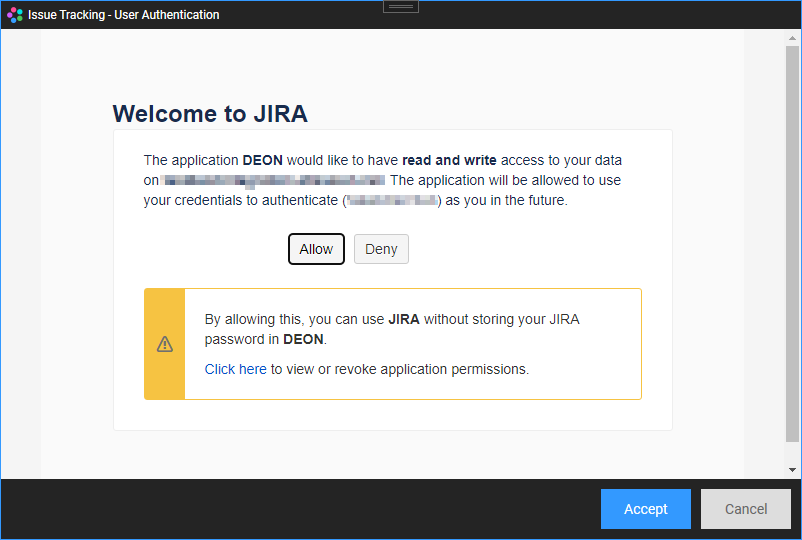
In almost every case, a connection to a server requires the user to authenticate and authorize DEON to access the target tracking system. Once a connection is configured in the connection setup and the cache creation process is started, this connection attempts to authenticate the user with the server. Therefore, DEON identifies the authentication type and provides several dialogs to facilitate this process.
Authentication dialog for Azure:
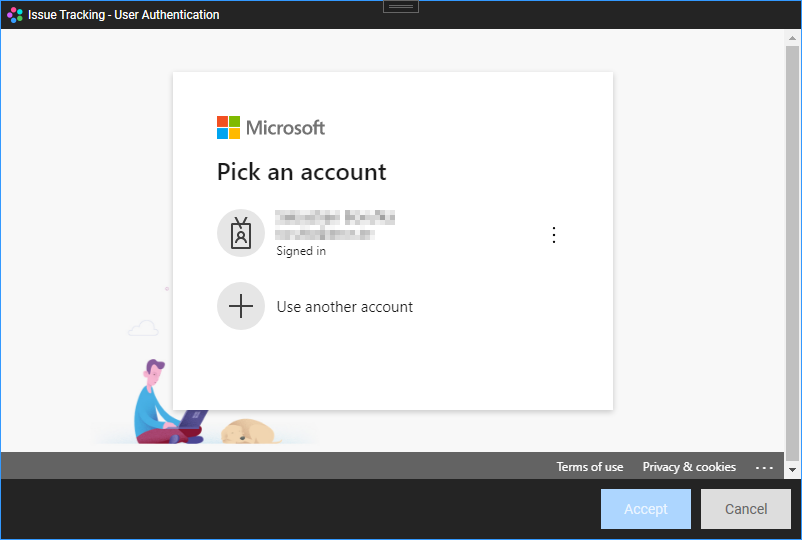
Authentication dialog for Jira (with OAuth):
General (API token or PAT)
If the authentication type is set to API-Token or PAT has been selected, the dialog looks completely different, without a web authorization request. Usually the combination of a username and this token is sufficient to fully complete the authentication and authorization process.
![]()
Once the authentication/authorization process is completed and successfully finished, this connection is now active and usable.
In any case, all provided login credentials are securely stored in the DEON perimeter settings, and as long as the authentication/authorization is accepted by the server, you do not need to re-enter them for the duration of the current session. Once the authentication session expires, DEON notifies the user before an issue tracking functionality can be used. In this scenario, the authentication process simply needs to be repeated.
Import/create tickets
New tickets can be easily created via the Widgets menu in the DEON main menu bar, as shown below.
![]()
The import option remains inactive until a valid connection has been set up.
![]() This button activates the issue creation tool. Click anywhere in the project to create a ticket. A new dialog appears, guiding you through all the necessary steps.
This button activates the issue creation tool. Click anywhere in the project to create a ticket. A new dialog appears, guiding you through all the necessary steps.
![]()
First, the designated connection must be selected from the first dropdown menu at the top, which is used to address the correct server. Second, a project should be selected from the list below and the target issue/ticket-type (e.g., bug, task, etc.) specified. Providing a good summary is also mandatory, as it serves as the summary/title of the ticket. Optionally, users can also add a priority, an assignee and a description . Once all necessary data have been entered, clicking Accept (if the Auto-Push setting is enabled, the button may read Accept And Sync ) creates a new ticket in the workspace. The new widget can look similar to the images above in the DEON integrated functions, depending on the last selected view mode
Existing tickets can be easily imported from external systems into your project from any connected server, and DEON offers several ways to do this.
Bulk import
![]() One option is the so‑called Bulk import, which can be invoked by opening the import dialog in the widgets menu on the DEON main menu bar. The following view appears:
One option is the so‑called Bulk import, which can be invoked by opening the import dialog in the widgets menu on the DEON main menu bar. The following view appears:
![]()
After selecting the target-connection and the intended project the list of issues/tickets is automatically updated. By default, finds the query only all items that relate to the selected project.
![]() This enables users to edit the search query manually.
This enables users to edit the search query manually.
Please note: Currently there is no validation check for syntax errors, invalid entries are possible and may lead to undesired search results!
The element list enables multiple selection, allowing users to import many elements simultaneously. Once all desired issues are selected, a click on Accept creates a new widget for each selected issue in the project. By default, all imported issues are treated equally and therefore placed in a grid layout. When issues are linked together, users can also arrange the tickets in DEON change.
![]() All selected elements are arranged in a evenly distributed grid.
All selected elements are arranged in a evenly distributed grid.
![]() This places parent Issues/Tickets over their linked children.
This places parent Issues/Tickets over their linked children.
![]() All selected elements are listed in a horizontal row, maintaining equal spacing between them.
All selected elements are listed in a horizontal row, maintaining equal spacing between them.
![]() This leads to the same result as above, but in a vertical direction.
This leads to the same result as above, but in a vertical direction.
Copy/Pasteü URLs
Another optionö, external Issues/Tickets into a DEON project to bring, is the copying and subsequentß pasting of the URL of the desiredü ticket. Important for the success of this process is that the URL-link contains the project name or the ID and the ticket ID/-numberä.
A possible valid (Azure) ticket URL looks ä similar to this: https://dev.azure.com/CompanyName/ProjectName/_workitems/edit/4889/
Import per Drag-and-Drop of URLs from a web browser:
Instead of copying the URL and einzufügen, können users also use a Drag-and-Drop operation to place the ticket in the DEON project space. The URL can be clicked and dragged directly über DEON from the browser and dropped there. DEON recognizes gültige URLs both for the copy/paste and for the Drag-and-Drop operations.
Both options also work within embedded web browsers in DEON. If users zufällig have placed a browser widget in their project, they can drag-and-drop or copy/paste ticket URLs from that browser into the DEON project without having to open these URLs externally first.
Editing and Synchronization
Click on a ticket to open the context menu. In the bottom row, you will see the issue tracking options.
![]()
![]() Opens the edit dialog, which allows users to change the current workflow status, assignee, priority, and issue description text.
Opens the edit dialog, which allows users to change the current workflow status, assignee, priority, and issue description text.
![]() Transfers pending changes to the server.
Transfers pending changes to the server.
![]() Retrieves issue/ticket data from the server. Please note: Unsynchronized local data will be overwritten!
Retrieves issue/ticket data from the server. Please note: Unsynchronized local data will be overwritten!
![]() Opens the issue URL in a browser.
Opens the issue URL in a browser.
![]() Using this menu button toggles through several display options for the selected issue(s).
Using this menu button toggles through several display options for the selected issue(s).
Notes
The tracking integration system operates with a local cache, which means that a certain amount of data must occasionally be loaded from the server and used to build a local data cache. Based on the user selection, this step must occur according to a recurring schedule (täglich, wöchentlich etc.). This process can take some time and largely depends on the number of projects that DEON finds on the server.
As a rule of thumb, users can expect that the more projects need to be collected from a server, the more data will be cached and the longer it will take to complete the cache creation step. DEON notifies the user as soon as the process is finished. During this time, the tracking functions are unavailable.