DEON is a visual collaboration platform. It opens a completely new and intuitive way of working and collaborating.
This tutorial provides you with the fundamentals you need to get started.
The DEON AI integration DEON Holistic Intelligence with the AI assistant DAIA is not covered in this tutorial. Please visit the following pages for that:
deon.de/deon-holistic-intelligence/
deon.de/dhi-10-ki-funktionen/
deon.de/help/bedienungsanleitung-daia/
A list of the new features in the current DEON version can be found under https://deon.de/help/whats-new.
You can download the app at https://account.deon.cloud/ download.
For the fastest learning success, please do not skip any step and read every NOTE and TIP.
- 1 Setup
- 2 Create your first DEON project
- 3 Create Text
- 4 Navigate
- 5 Create Screenshots
- 6 Move and scale elements
- 7 Drag files and documents into the workspace
- 8 Embed web browser
- 9 Stack elements to create groups
- 10 Crop and Resize
- 11 Multi-page Documents
- 12 Template Library
- 13 Presentation Paths
- 14 Copying between Projects
- 15 Share and Link
- 16 Export
- 17 Versioning
1 Setup
After you have installed DEON, make sure that the DEON icon is in your taskbar (usually at the bottom right of your screen): ![]()
If you can't find it in your taskbar, you may need to drag it from the hidden icons area to there:

If you can't find it in the hidden icons area, start DEON once via your Windows Start menu or from your desktop.
Back to top2 Create your first DEON project
Click with the left mouse button on the DEON icon in your taskbar ![]() to display the DEON start screen.
to display the DEON start screen.
Press ![]() . Your first DEON project will appear:
. Your first DEON project will appear:
![]()
TIP You can also right-click the DEON taskbar icon and select “New Project” to be even faster.
Back to top3 Create Text
Use the ![]() text tool or press Tab, then click with the left mouse button somewhere in the workspace and start typing. To finish the text, click somewhere in the empty workspace.
text tool or press Tab, then click with the left mouse button somewhere in the workspace and start typing. To finish the text, click somewhere in the empty workspace.
Create a new text, start typing, but press at the end of your line Enter while holding Ctrl pressed. This starts a new text under your current one.
Now place your text cursor somewhere in the middle of your text line and press again Enter while you Ctrl hold down. This splits your text into two parts.
Instead of Ctrl+Enter you can also Tab press to create the new text on the right.
TIP A complete list of keyboard shortcuts can be found here
TIP You can even create polls with text labels. Take a look here!
4 Navigate
Move: Hold down the right mouse button and move the mouse to shift your workspace. This does not move the elements (your text lines), only your view.
Zoom: While holding down the right mouse button, also press and hold the left mouse button. Move the mouse up or down while holding both mouse buttons to zoom. This „Powerzoom“ is much better than using the mouse wheel to zoom.
NOTE The center of the zoom is always the position of your mouse.
TIP Remember these steps to navigate like a pro:
- Move your mouse to the location of your interest.
- Hold down the right mouse button and move your mouse to bring this point to the center of your screen.
- Continue holding down the right mouse button and press and hold down the left mouse button, then move your mouse down to zoom in.
TIP If you get lost in the room, press ![]() in the toolbar, to view the entire project.
in the toolbar, to view the entire project.
TIP If you are using a laptop with a trackpad but without a mouse: Place your left pinky finger on Ctrl and your left index finger on Space. Keep both keys pressed and move your right index finger on the trackpad to shift your view (without clicking trackpad buttons). To zoom, keep your left pinky finger on Ctrl and simply slide your left index finger from Space to Alt. Then move your right index finger on the trackpad up/down (without clicking trackpad buttons).
Back to top5 Create Screenshots
NOTE You können capture screenshots of any application. In the following example, you create a screenshot of a web browser. In this case, DEON automatically saves a link to the website für you.
- Open any website
- Go back to DEON and click on the
 Screenshot button in the main menu or press S. DEON automatically brings the previously active window to the foreground (in this case your web browser) and a crosshair cursor appears.
 - Drag a selection frame with the left mouse button
- Your screenshot appears in the inbox below your workspace
- Drag the screenshot from the inbox into the workspace.
NOTE DEON automatically saved the website link in the screenshot. This enables you to create visual bookmarks without spending time naming or sorting conventional bookmarks.
Select the screenshot in the workspace (left click) and click the ![]() Link button in the upper right corner. Your default web browser opens the linked URL.
Link button in the upper right corner. Your default web browser opens the linked URL.
TIP The automatic link also works when you create screenshots of documents such as PPTX, XLSX, DOCX or PDF.
TIP You können create a screenshot of the project yourself by holding the Shift key gedrückt, before you click the screenshot button.
6 Move and scale elements
Drag elements with the left mouse button to change their position in the workspace.
TIP To duplicate elements quickly, hold Ctrl gedrückt, before you release the dragged element.
Multiple Selection
To move multiple elements, first drag a multiple selection frame (left mouse button) around the elements (elements must be completely within the frame) and then drag the entire multiple selection. To cancel the multiple selection, click anywhere in the empty workspace.
TIP By holding Alt gedrückt, before you start multi-selection, können you überall a multi-selection durchführen, without accidentally moving a background element.
TIP To use a lasso, hold Shift pressed, before you start the multi‑selection. The lasso selects all elements that it touches or are at least partially within the lasso.
TIP Hold Shift or Ctrl pressed and click on the elements or drag a selection frame around the elements you want to add to an existing multi‑selection or remove from it.
TIP To align multiple elements: drag a multi‑selection and then use the ![]() alignment buttonäches in the context menuü or use the function Auto‑arrange.
alignment buttonäches in the context menuü or use the function Auto‑arrange.
Scale
To scale an element or an entire multiple selection, drag one of the ![]() scaling handles at the corners.
scaling handles at the corners.
NOTE Scale elements only if you really want to change their size. If you want to examine something closely, do not scale the element but instead zoom your workspace. If you are unsure whether an element is too large or too small, click the ‚Show entire project‘ button ![]() and then on the 0-Level button
and then on the 0-Level button ![]() to zoom to 0-Level. Rule of thumb: At 0-Level a document page or PowerPoint slide fits into the workspace.
to zoom to 0-Level. Rule of thumb: At 0-Level a document page or PowerPoint slide fits into the workspace.
Smart Align
The blue Smart Align lines help you align elements. You can disable Smart Align by quickly shaking an element or the Smart Align button ![]() toggle.
toggle.
Autoarrange
Use the double-line handles ![]()
![]() to quickly align and rearrange elements. To stretch the Abstände gleichmäßig: Wählen all elements, move them together first, then deselect, Wählen them again and stretch them outward.
to quickly align and rearrange elements. To stretch the Abstände gleichmäßig: Wählen all elements, move them together first, then deselect, Wählen them again and stretch them outward.
7 Drag files and documents into the workspace
- Open the Windows File Explorer by clicking the Explorer button or Win+E press.
- Now select a PowerPoint document and drag it into your DEON workspace.
NOTE DEON supports many different formats, but we will later need a PowerPoint in this tutorial.
Copied vs. linked files
Drag the same PowerPoint document into your workspace again, but this time hold (just before releasing) Shift pressed.
NOTE By Shift pressed hold, you can choose between linking or copying a file. A linked file is not copied to the DEON server, but a link to your original file location (local drive, network share or SharePoint/OneDrive) is created.
NOTE If your File Explorer folder was a OneDrive folder, DEON automatically links with OneDrive and you can edit the file directly in the DEON workspace.
Öffnen now your ursprüngliches Powerpoint document by double‑clicking in your normal Windows File Explorer (not in DEON). Make some Änderungen and close it again (Änderungen save). Note that after a few seconds you will see the Änderungen in your DEON workspace. The copy you initially placed (without Shift to press), ändert does not change, because it was copied to the DEON server and has no link to the original file. You can however continue to öffnen and edit it by selecting it and pressing the file button in the upper right corner. The verknüpfte document also includes a über link button in the upper left corner that takes you to its ursprünglichen location.
NOTE Advantages of linked files:
- No redundant copies.
- Keep the file accessible at its original location outside of DEON.
- See changes to documents in DEON immediately when someone modifies the original file outside of DEON.
NOTE Note when using linked files:
- If the original file is deleted outside of DEON or its storage location is unreachable, only a gray placeholder is visible in DEON.
- If you share your DEON project with other users (as described later in this tutorial), make sure they have access to the original file (e.g. in a shared network folder). Otherwise, they will only see a gray placeholder.
- If you link files from a local drive (not a network drive) on your computer, they are only visible in DEON on the same computer.
Using Excel Files
NOTE If you have Microsoft O365, you can edit Excel files directly in the DEON workspace. Otherwise you can use the built-in DEON Excel viewer:
- Drag an Excel file from your Windows File Explorer into the DEON workspace using Drag & Drop. If it contains multiple sheets, DEON lets you select them.
- Trim the sheets with the horizontal and vertical handles

 .
. - Scroll vertically and horizontally with the right mouse button or two fingers, or use the mouse wheel. To add sheets from the same file, select an existing sheet in the workspace and click "Add Sheet" in the context menu.
 .
.
Editing MS O365 documents directly in the workspace
NOTE Skip this step if you do not have Microsoft O365
Select a document that you have dragged from your file explorer OneDrive folder into the DEON workspace.
For PowerPoint and Word: Click in the context menu on the MS Office button ![]() . Select the document again, wait until the green frame appears, and start editing.
. Select the document again, wait until the green frame appears, and start editing.
For Excel: Just wait until the green frame appears, and start editing.
TIP You can also drag & Drop file folders from your Windows File Explorer into the workspace. They appear as links. If the folder contains only images with identical dimensions, they appear as a slideshow.
TIP DEON provides an integrated file watcher called "Monitoring current files", which can automatically display the most recent file in a folder. This works with network folders and local folders. Monitoring current files is especially useful when you work with constantly updated versions of the same document in a folder. DEON automatically searches for the most recent file in the folder that matches a predefined naming scheme. To use Monitoring current files, follow these steps:
1. Drag a file from a network folder or a local folder into the workspace. Make sure you hold the Shift key before dropping the file to link it instead of creating a copy.
2. Select the file in the workspace. In the context menu, press the "Monitoring current files" button (a folder icon with an eye). Check the "Enable monitoring" box and enter the string to match the filename. Optionally you can also add a second string and combine it with AND or OR logic.
8 Embed web browser
The unique DEON Metabrowser Engine enables you to embed hundreds of websites and web applications into any DEON project. View and use them instantly side by side with all your other content. Whatever web-based application you use for your work, you can use it directly in DEON.
Open your preferred web browser, navigate to any website, copy the URL (e.g., https://de.wikipedia.org) to your clipboard by selecting it and Ctrl+C drücken. Gehen Sie dann zurück zu DEON und fügen Sie die URL in Ihren Arbeitsbereich ein, indem Sie Ctrl+V drücken. Sie können die URL auch per Drag & Drop von Ihrem Webbrowser nach DEON ziehen.
A web browser is created in the workspace. It is active (blue frame) when you select it. To deactivate it again, click anywhere outside the web browser. To keep it permanently active, click in the context menu on the ![]() button “Keep active”.
button “Keep active”.
TIP You can use web applications such as MS Office365 or Google Docs in your DEON workspace by simply pasting the URLs from your regular browser. Or drag your files directly from your OneDrive Windows File Explorer folder via Drag & Drop and click the MS Office button ![]() .
.
TIP YouTube and Vimeo URLs are automatically recognized and the videos appear without borders.
Back to top9 Stack elements to create groups
NOTE Grouping elements in DEON is as simple as stacking paper.
Select multiple elements in your workspace and click in the context menu on ![]() . DEON automatically creates a shape in the background of the selected elements.
. DEON automatically creates a shape in the background of the selected elements.
You can also create such shapes manually:
Click the ![]() shapes button in the main menu or press M, select a fill and outline color and then click and drag in the workspace.
shapes button in the main menu or press M, select a fill and outline color and then click and drag in the workspace.
To extract elements from a stack, simply delete the background element:
Or simply move elements away from the background. If you wait before releasing, the background shape expands automatically. To prevent this „automatic resizing“, just let go faster.
NOTE You can enable or disable this behavior in the settings under „Input and Navigation/Auto-Expand“.
Automatic rising and docking
NOTE DEON automatically brings elements to the foreground when they are covered by larger elements:
Try it out by dragging a shape or document over other (smaller) elements in the workspace. The obscured elements rise automatically:
If you want to prevent this, simply pin the elements that should not rise, using the ![]() Button in the context menu. Pinned elements are „glued“ and only rise when that background rises (because a larger element covers it).
Button in the context menu. Pinned elements are „glued“ and only rise when that background rises (because a larger element covers it).
Pinning also prevents elements from being moved relative to their background. If you move a pinned element, its background will also move:
If you pin an element directly to the workspace, it cannot be moved at all until you release it again.
Pinning a background element also helps you to perform a multiple selection of elements on it:

Disable stacking and pinning mode
This mode can accelerate complex layout situations. Pinning, stacking and rising are disabled by this button ![]() disabled. You können then move elements without affecting other stacked or pinned elements.
disabled. You können then move elements without affecting other stacked or pinned elements.
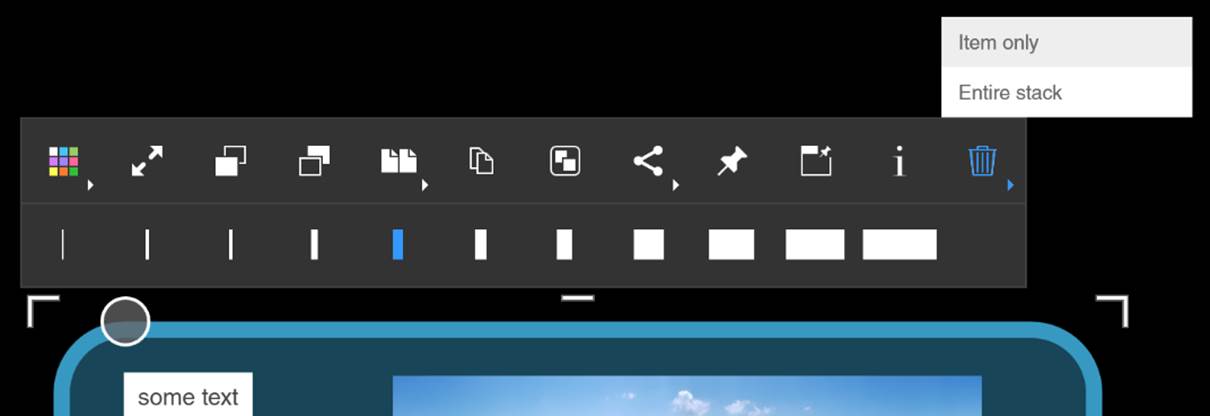
10 Crop and Resize
Use the ![]() vertical and
vertical and ![]() horizontal handles to change or crop elements in the Größe. Depending on the type of element, the effects differ:
horizontal handles to change or crop elements in the Größe. Depending on the type of element, the effects differ:
Crop images and documents:
Moving the ![]() or
or ![]() handles crops the image or document pages. This is especially nützlich für große Excel tables.
handles crops the image or document pages. This is especially nützlich für große Excel tables.
Change a line of text to a floating text box:
By moving the ![]() or
or ![]() handles you can change a text line into a floating text box with automatic word wrap. Locked handles appear blue. By double‑clicking a handle you can lock/unlock it. A red handle at the bottom indicates text overflow.
handles you can change a text line into a floating text box with automatic word wrap. Locked handles appear blue. By double‑clicking a handle you can lock/unlock it. A red handle at the bottom indicates text overflow.
Trim/resize web browser:
By moving the ![]() and
and ![]() size‑adjustment handles you can create a web browser with very specific dimensions. This is useful when you want to view an entire scrollable website as a long image.
size‑adjustment handles you can create a web browser with very specific dimensions. This is useful when you want to view an entire scrollable website as a long image.
TIPMake sure not to make it too large. Unlike the ![]() scaling handles increase the
scaling handles increase the ![]() size‑adjustment handles the resolution (and system load) of the browser when you enlarge the web browser. While for the
size‑adjustment handles the resolution (and system load) of the browser when you enlarge the web browser. While for the ![]() scaling handles the web‑browser resolution remains constant, only the display in the workspace scales (just like zooming the workspace itself).
scaling handles the web‑browser resolution remains constant, only the display in the workspace scales (just like zooming the workspace itself).
Change shape size:
Moving the ![]() and
and ![]() size adjustment handles changes the size of the shape, but retains the corner radius, and elements on the shape retain their size. Elements on it are pushed in the size adjustment direction when they reach the edge.
size adjustment handles changes the size of the shape, but retains the corner radius, and elements on the shape retain their size. Elements on it are pushed in the size adjustment direction when they reach the edge.
Scaling with the ![]() scaling handles scales the entire stack of elements as one unit.
scaling handles scales the entire stack of elements as one unit.
11 Multi-page Documents
Bring the Powerpoint document that you previously dragged into your workspace to the center of the screen and press the ← → arrow keys to flip pages, or use a clicker.NOTE You do not need to select it first. If it is in the center of the screen, DEON automatically assumes you want to flip the pages.
Use the slider below to quickly scroll through large documents:
Select the document again and select the ![]() Grid view button from the context menu to expand all pages.
Grid view button from the context menu to expand all pages.
To create a screenshot of a page: Click on the document (if not already ausgewählt) and then on the ![]() Screenshot button in the lower right corner of the page.
Screenshot button in the lower right corner of the page.
Now extract another page with the ![]() extraction button in the same corner.
extraction button in the same corner.
NOTE The screenshot is simply an image of the page, während the extracted page remains linked to the document and you can open the full original document öffnen können by pressing the ![]() file button in the upper right corner of the individual extracted page drücken.
file button in the upper right corner of the individual extracted page drücken.
TIPYou can easily combine multiple PowerPoint documents or extracted pages into a new document: Select the pages or documents you want to combine, multiple times. Click in the context menu on the ![]() Merge button.
Merge button.
TIP To compare a page (or another element in your workspace) with remote elements in your workspace: Select the element and select ![]() Anchor element in the context menu. The window with the anchored view remains in front of your workspace, while you navigate to another location.
Anchor element in the context menu. The window with the anchored view remains in front of your workspace, while you navigate to another location.
Zoom now to a page and press the ![]() Collapse button. DEON collapses the document, flips to this page and automatically centers the document on the screen:
Collapse button. DEON collapses the document, flips to this page and automatically centers the document on the screen:
Annotations on documents
Click on ![]() in the Hauptmenü or press P to switch to sketch mode. Draw some annotations on various pages of your document. Also try the two different
in the Hauptmenü or press P to switch to sketch mode. Draw some annotations on various pages of your document. Also try the two different ![]() erasers from the sketch menu.
erasers from the sketch menu.
To exit the sketch mode, click on the ![]() Pointer mode button in the Hauptmenü or press V.
Pointer mode button in the Hauptmenü or press V.
TIP If you have a touchscreen with an active pen (like Microsoft Surface), DEON automatically switches between sketch mode and pointer mode für you, and you können the back of your pen to erase.
Create some arrows: Click on ![]() in the main menu or press L. Choose
in the main menu or press L. Choose ![]() from the submenu. Start your arrow at a line of text and point it to a location in your document. Or drag the horizontal or vertical connector handles
from the submenu. Start your arrow at a line of text and point it to a location in your document. Or drag the horizontal or vertical connector handles![]()
![]() at the edges of an element to create connectors directly.
at the edges of an element to create connectors directly.
NOTE When you flip through the pages of your document, all annotations remain on their respective pages.
TIP To export the PowerPoint document together with the annotations on it: Click on a page, wählen Sie ![]() Share/Export in the context menu and wählen Sie „Exportieren … with annotations“.
Share/Export in the context menu and wählen Sie „Exportieren … with annotations“.
12 Template Library
NOTE Every piece of content you create in your projects can be used as a template when you save it in your library. Your library is available in each of your projects. You können also share templates with other users.
Select the elements or select them multiple select, which you would like to save as a template. Click in the context menu on ![]() Share/Export and select
Share/Export and select ![]() .
.
Click on ![]() in the main menu, to open your library. To see how it works, you can now drag & Drop your newly created template into your workspace.
in the main menu, to open your library. To see how it works, you can now drag & Drop your newly created template into your workspace.
Now select a single element in your workspace, click again on ![]() Share/Export, but select this time
Share/Export, but select this time ![]() .
.
Öffnen Sie Ihre Bibliothek (falls noch nicht geöffnet) und klicken Sie auf ![]() in der oberen linken Ecke. Aktivieren/deaktivieren Sie die Kontrollkästchen
in der oberen linken Ecke. Aktivieren/deaktivieren Sie die Kontrollkästchen ![]() und
und ![]() um zu sehen, wie der Filter funktioniert.
um zu sehen, wie der Filter funktioniert.
NOTE Der einzige Unterschied zwischen Vorlagen und Symbolen ist die Benennung. Es hilft Ihnen, Ihre Bibliothek in zwei Bereiche zu kategorisieren. Sie sollten einfach „Vorlagen“ für alles verwenden, was nicht wie ein Symbol verwendet wird.
TIP „Template“ and „Symbol“ are predefined tags. You can create and reuse as many individual tags as you like: Right‑click a template (or a symbol) in your library and select ![]() . Enter your desired tag name and press
. Enter your desired tag name and press ![]() . You will find your newly created tag in the list below, where you can also assign other existing tags.
. You will find your newly created tag in the list below, where you can also assign other existing tags.
TIP You can edit multiple library items simultaneously by drawing a frame around them or selecting multiple items with Ctrl or Shift select.
Modify templates
NOTE A template is technically the same as a regular DEON project. You can open it with the same flexibility and edit it:
Double-click on a template or a symbol in your library. It opens in a new DEON window. Make your changes and simply close the window when you are finished. Changes are saved instantly while you make them (even before you close the window).
NOTE Although templates are technically DEON projects, they do not appear in your project list. You can only find them in your library.
TIP You can use SVG for icons. SVG is a vector format and vectors do not become blurry when enlarged like pixels. DEON supports SVG via Drag & Drop and you can also copy/paste vectors directly from ADOBE Illustrator. Doodles, shapes, arrows, lines and text that you create directly in DEON are also vectors.
Share Templates
Select one or multiple items in your library. Right-click on them and choose ![]() from the context menu.
from the context menu.
The invitation window appears. Enter the user's email address with whom you want to share your project, and click ![]() . The entered email appears in the field below, where you can adjust the rights for this user. Then click
. The entered email appears in the field below, where you can adjust the rights for this user. Then click ![]() .
.
NOTE If the entered email address does not yet have a DEON account, an invitation email with further instructions is automatically sent to this address.
The templates or symbols you have shared will be listed immediately in the library of other users.
TIP To share with multiple users simultaneously: Enter multiple email addresses separated by semicolons ; or line breaks, or copy/paste a list from Excel or any text file.
Back to top13 Presentation Paths
NOTE DEON enables you to instantly switch between work and presentation, without wasting time on exports and fiddly layout.
Switch to presentation mode by clicking in the main menu ![]() and then
and then ![]() click.
click.
Select the elements now or select them multiple, which you want to present as the first step, and click on the ![]() Add step button in the presentation path menu under your workspace.
Add step button in the presentation path menu under your workspace.
Select other elements for your second step and press again ![]() . Repeat this until you have five steps in your timeline.
. Repeat this until you have five steps in your timeline.
Select now (click on) the first step in your timeline and press the ![]() Present button far left or simply press F5.
Present button far left or simply press F5.
DEON switches to fullscreen mode and you can use the arrow keys ←→ on your keyboard or your preferred remote clicker to navigate through your presentation path.
TIP You can continue to navigate the workspace with your mouse, your touchscreen or trackpad. Press k to fly back to the current step.
To exit full-screen mode, press once Esc . To exit the presentation path mode completely, press again Esc . During full-screen mode you can also use the on-screen buttons that appear when you click or touch the screen once.
TIP You can directly after opening a DEON project F5 press to start the first presentation path from the beginning.
TIP You can export your presentation path to a multi-page Powerpoint or PDF document: Press left of your presentation path timeline on ![]() and select
and select ![]() .
.
TIP You can create automatic presentations by setting a timer for each step. If the last step has a timer >0, the presentation will play in a loop.
Back to top14 Copying between Projects
NOTE Normally you have multiple DEON projects open simultaneously. This gives you the agility, throughout the day instantly to switch between different topics. You can also easily copy and move elements between projects. If, for example, you do not want to share an entire project, you can copy a part of it into a second project and share this excerpt instead. Try now to copy between projects:
Leave your current project geöffnet and create a new project, as you did in Step 2 done.
TIP To switch quickly between multiple open projects, use the Windows key combination Win+Tab as a good alternative to Alt+Tab.
Select elements in your first project or select them multiple times. Press Ctrl+C to copy the elements, or Ctrl+X to cut them. Switch to your second (empty) project. Press Ctrl+V to paste the elements.
Back to top15 Share and Link
NOTE Sharing projects with other users is like sharing a desk or a room with them. The other users können open the shared project at any time and überall view or edit the elements in the workspace (if you have allowed it).
To share a project, click in the main menu on the „Share“ button ![]() (
(![]() in älteren versions) and select
in älteren versions) and select ![]() . If your project is still unnamed, you will be prompted to give it a name. Then the invitation window appears. Enter the user's email address with whom you want to share the project and click on
. If your project is still unnamed, you will be prompted to give it a name. Then the invitation window appears. Enter the user's email address with whom you want to share the project and click on ![]() . The entered email appears in the field below, where you can adjust the rights for this user. Click then on
. The entered email appears in the field below, where you can adjust the rights for this user. Click then on ![]() .
.
NOTE If the entered email address does not yet have a DEON account, an invitation email with further instructions is automatically sent to this address.
TIPWhen sharing with multiple users simultaneously: Enter multiple email addresses separated by semicolons ; or line breaks, or copy/paste a list from Excel or any text file.
The project you have shared will be listed immediately in the project list of the other users.
To get an impression of how it works when two users have opened the same project, you can open a second instance of it on your own computer:
Double-click on the small ![]() DEON taskbar icon. Remember that a single click opens the notification window. A double-click now launches a new DEON instance and brings up the DEON start screen, where you can find all your own projects and projects of other users that have been shared with you.
DEON taskbar icon. Remember that a single click opens the notification window. A double-click now launches a new DEON instance and brings up the DEON start screen, where you can find all your own projects and projects of other users that have been shared with you.
TIP Click the ![]() List view /
List view / ![]() Grid view button in the top right corner of the start screen to switch between a thumbnail view or text view of your project list.
Grid view button in the top right corner of the start screen to switch between a thumbnail view or text view of your project list.
Double-click on your project (which is currently still in the second instance of DEON geöffnet ist), to open it. You now have two DEON windows with the same DEON project.
Try navigating and editing your project in both instances. Note that each instance can display a completely different part of the same project, but changes are synchronized immediately. This experiment demonstrates how other users would experience your shared project.
TIPIf you want other users to follow you and see the same part of the project (e.g., während a conference call), drücken Sie im Hauptmenü den ![]() Connected View button. Read more über this powerful feature here.
Connected View button. Read more über this powerful feature here.
TIPYou can share a link to any element or any Multiple selection in a project: Select elements in your workspace or select them multiple times. Click in the context menu on ![]() Share/Export and select
Share/Export and select ![]() . You can now paste this link into any email or chat program (Ctrl+V) and send it to other users. When the recipient clicks the link, DEON automatically loads the project and navigates to the linked elements. Remember that it must be a shared project, otherwise access will be denied.
. You can now paste this link into any email or chat program (Ctrl+V) and send it to other users. When the recipient clicks the link, DEON automatically loads the project and navigates to the linked elements. Remember that it must be a shared project, otherwise access will be denied.
TIP If you have Microsoft Teams installed, sharing links während a chat is even faster. Click in the context menu on ![]() Share/Export and select
Share/Export and select ![]() . DEON automatically copies the link into your currently active chat input field.
. DEON automatically copies the link into your currently active chat input field.
NOTE Keep in mind when sharing projects that verknüpfte Dokumente in your project can only be seen by users who have access to the original file location (e.g., a network share), otherwise they will only see a gray placeholder.
Creating shortcut buttons in the workspace
You can turn images or Screenshots into clickable buttons. The target link URL can be:
- Any external URL like https://deon.de
- Any file path to a file or folder like D:myfolder or D:myfolderimage.jpg
- Any element or any selection in the current project or in another DEON project:
Select several elements in any DEON workspace multiple times, click in the context menu on Share/Export and select
  .
. - Any DEON project: Right-click on a project in the start screen and select 'Copy Link'.
- Copy any target link URL to your clipboard.
- Select any image or screenshot in any DEON workspace and click the Edit Link button in the context menu
 .
. - Paste the previously copied link into the field. You can now choose whether the entire image should serve as a button. Otherwise, a small button appears in the top right corner of the image.
NOTE To select a button that is fully clickable, you must draw a selection frame around it.
TIP Take a look at the Jira and Azure DevOps integration to add and link issues.
16 Export
NOTE If your workflow zulässt, it is better to stay in DEON rather than exporting. You können the Sharing functions use to exchange information, and the Presentation path to hold Präsentationen. You könnten also vorübergehend copy elements into another DEON project, if you do not want to share an entire project möchten, and copy the items später back zurückkopieren. If you stay in DEON, you remain more flexible and interactive and avoid redundant data. However, there are situations where export is unerlässlich, and the following powerful export functions are practical:
Exporting some elements or the entire project
Select some elements in your workspace or select them multiple times. Click in the context menu on ![]() Share/Export and select PDF or Powerpoint as the export format. To export the entire project, simply drag the selection box over all elements. You can also save the selected elements in their original format by choosing “Save as…” . If you have selected multiple elements, a ZIP file will be created.
Share/Export and select PDF or Powerpoint as the export format. To export the entire project, simply drag the selection box over all elements. You can also save the selected elements in their original format by choosing “Save as…” . If you have selected multiple elements, a ZIP file will be created.
Export to a multi-page document
Verwenden Sie die Funktion „Exportieren mit Anmerkungen“ eines PowerPoint-Dokuments oder verwenden Sie die Exportfunktion eines Präsentationspfads oder verwenden Sie die Folienfunktion. Mit der Folienfunktion können Sie mehrere Folien in Ihrem Arbeitsbereich platzieren. Diese Folien können später in eine mehrseitige Powerpoint exportiert werden, nachdem Sie Texte, Bilder, Kritzeleien und Formen darauf erstellt haben. Um den Hintergrund dieser Folien anzupassen (z. B. mit Ihrem Firmenbranding), können Sie POTX-Dateien importieren. Sie können einfach Ihre eigenen POTX-Dateien erstellen, indem Sie eine Powerpoint als POTX anstelle von PPTX speichern.
To create slides in your workspace, click in the main menu on the ![]() Widgets button, then on the
Widgets button, then on the ![]() New presentation slide button and click anywhere in the workspace. Choose a template and a layout and click on
New presentation slide button and click anywhere in the workspace. Choose a template and a layout and click on ![]() .
.
To create additional identical slides, hold Ctrl pressed and drag a slide (or multiple multiple selected slides).
NOTE Slides cannot be scaled. This helps you maintain a constant size ratio between multiple pages.
Now create content on the slides or drag and scale existing content onto them.
Select all slides multiple times, click in the context menu on ![]() Share/Export, select
Share/Export, select ![]() and click on
and click on ![]() . The order of the slides in the exported PowerPoint is defined by their position in the workspace (from left to right or top to bottom).
. The order of the slides in the exported PowerPoint is defined by their position in the workspace (from left to right or top to bottom).
17 Versioning
NOTEDEON is a command‑based system. This means that every individual action, such as a stroke or moving an element, is immediately stored as a command, and a DEON project is the result of a sequence of commands. This principle enables you to restore a copy of a project from any stage of its creation at any time. One reason could be to look back in time or to restore a project that was accidentally messed up by a user.
Switch to the start screen by clicking in the upper left corner of an open project on ![]() click or on the small
click or on the small ![]() DEON taskbar icon double-click. Right-click on a project and select
DEON taskbar icon double-click. Right-click on a project and select ![]() from the context menu. Now navigate through the history list by clicking on the
from the context menu. Now navigate through the history list by clicking on the ![]() buttons to fully descend a tree to a desired revision number. Click then on
buttons to fully descend a tree to a desired revision number. Click then on ![]() . Wait while the copy of the project is being created. You may be asked whether you want to share this copy with the same users who already had access to the original project. Afterwards the restored project appears in your project list.
. Wait while the copy of the project is being created. You may be asked whether you want to share this copy with the same users who already had access to the original project. Afterwards the restored project appears in your project list.